


Most Recent Posts
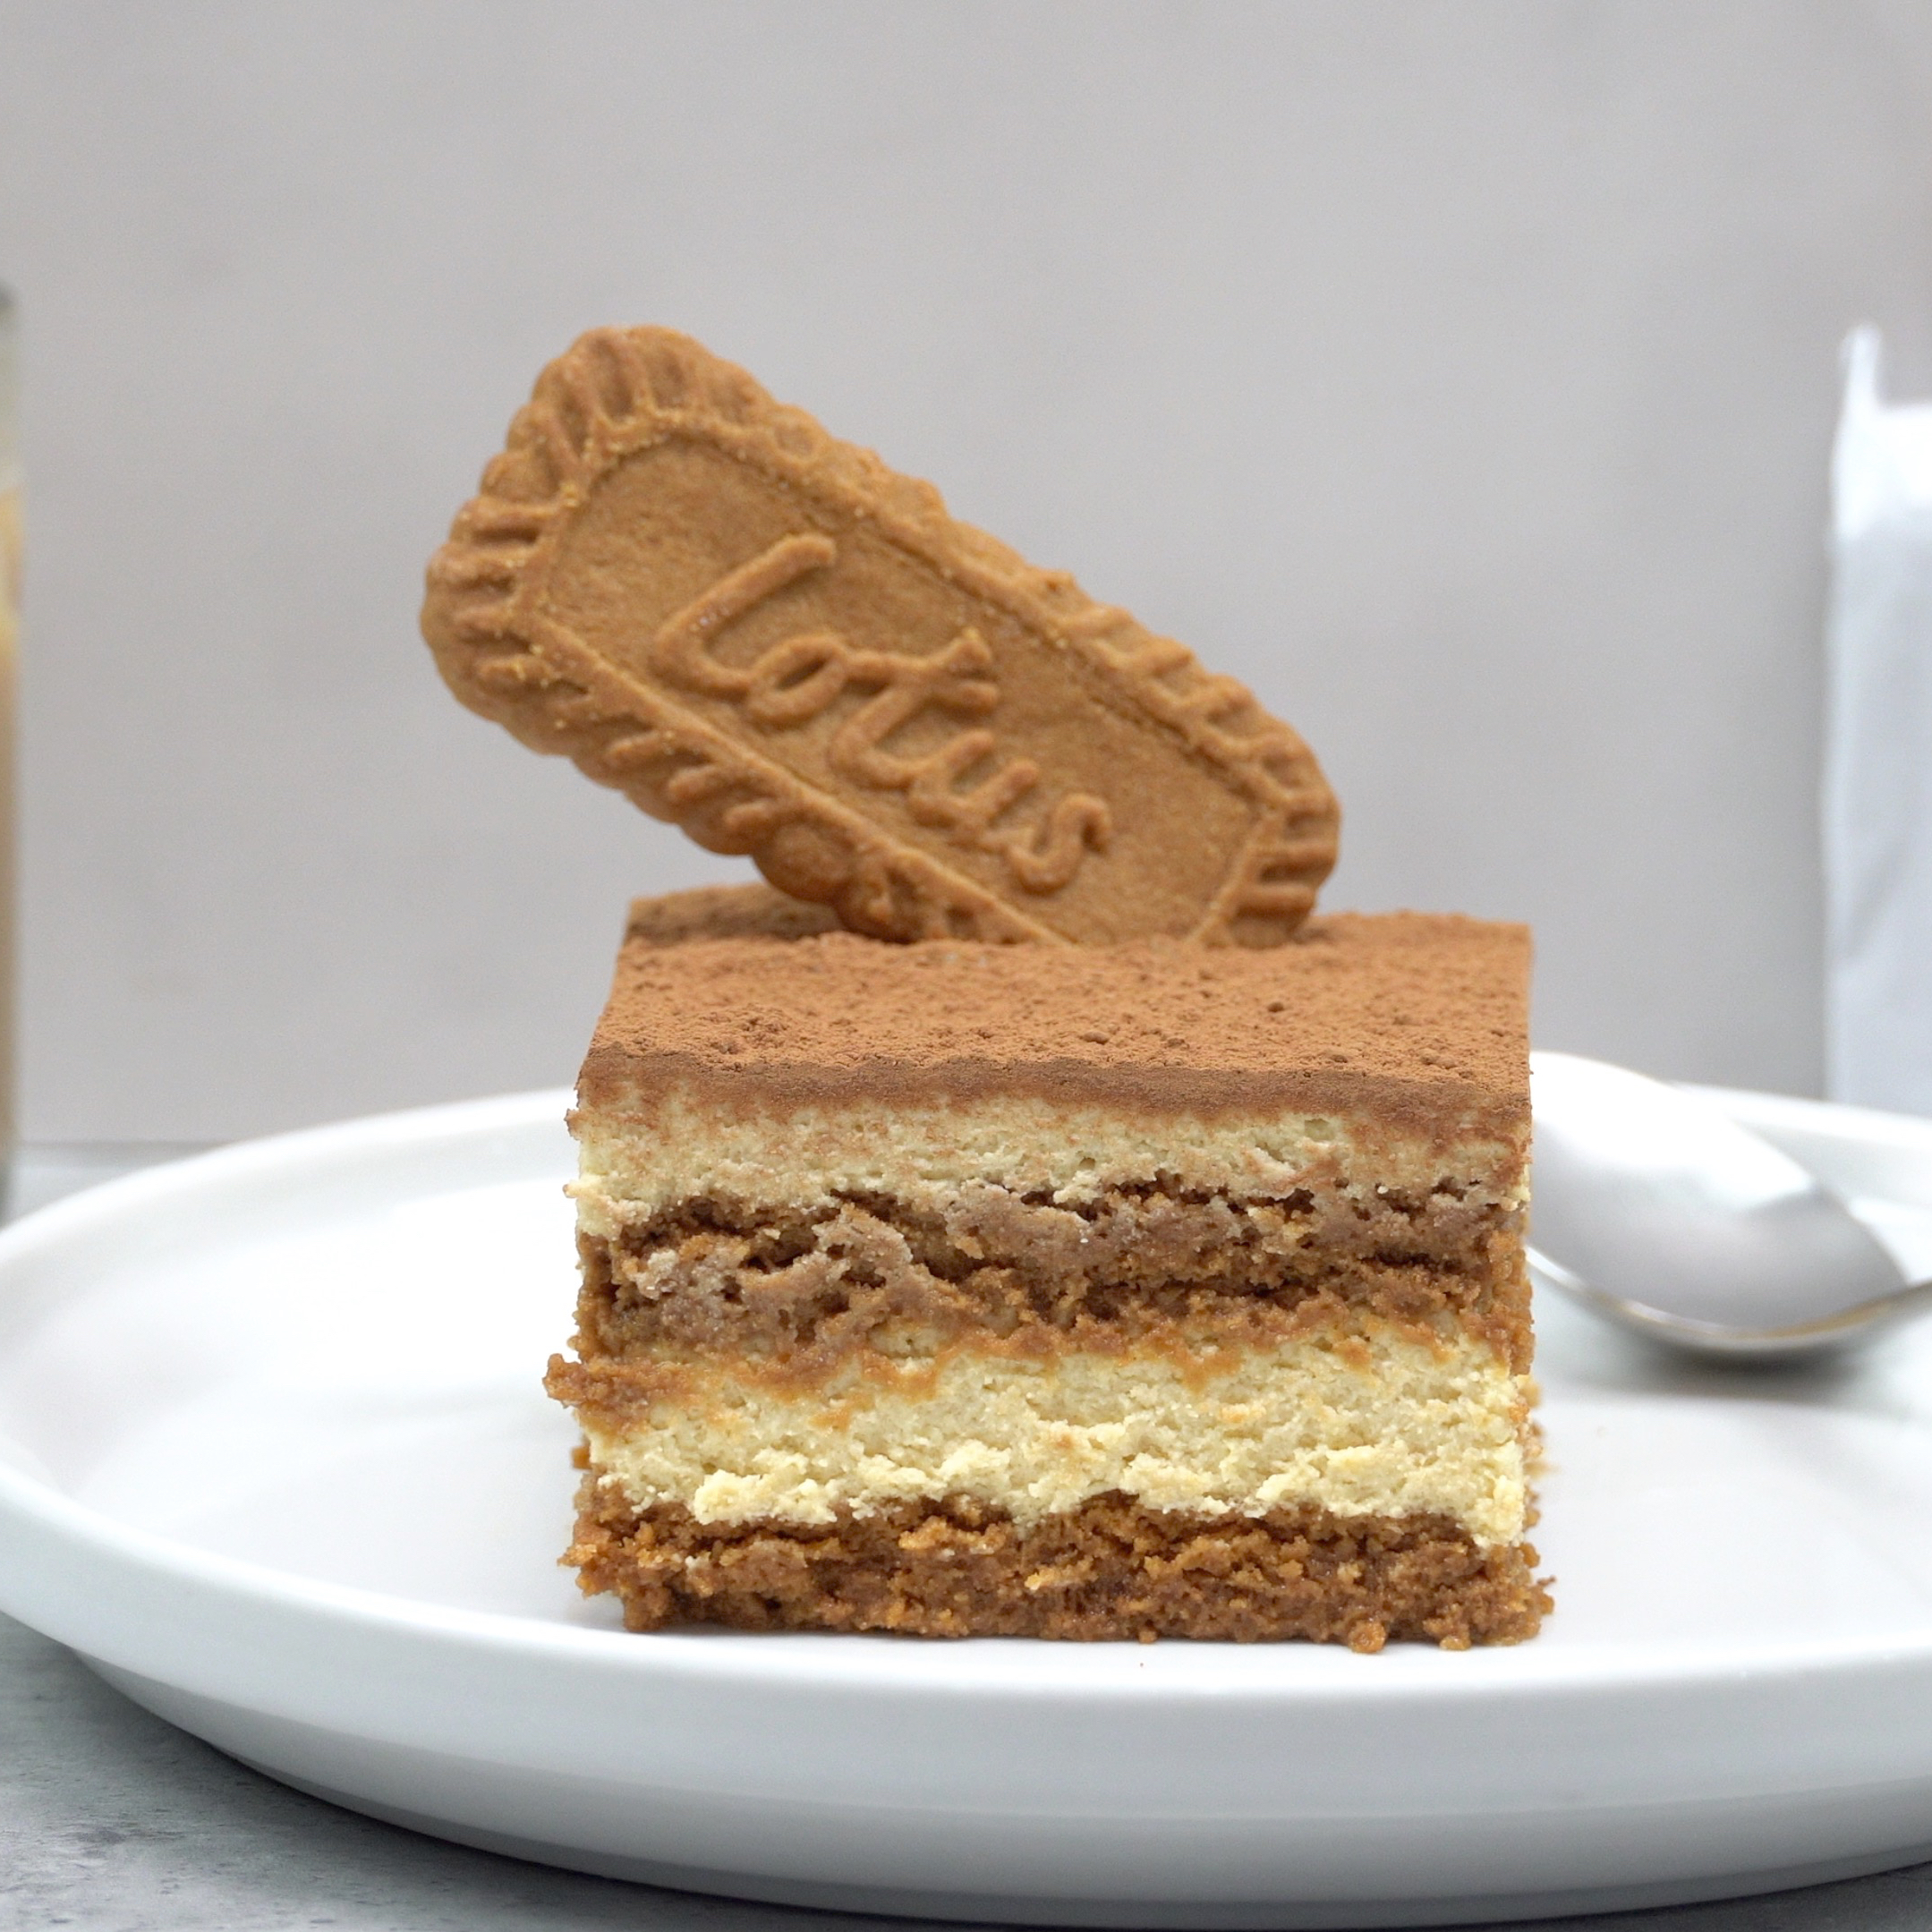
Biscoff Tiramisu
Biscoff Cookies Tiramisu is very similar to the classic tiramisu with a traditional coffee flavor but with a twist. The biscoff butter spread custard is scrumptious, smooth and sweet. This tiramisu is perfect for anyone who loves biscoff cookies. Biscoff cookies are usually served with a cup of coffee. With this tiramisu, the cookies are dipped in coffee and paired with a creamy butter spread custard.
I personally enjoy this very much because one of my favorite things is Tiramisu. This is perfect as a morning snack or dessert and is awesome with a cup of your favorite tea. This creamy and delicious slice of heaven on earth is worth the preliminary activities to create such a masterful dessert that everyone will love. Have this fancy restaurant quality Biscoff Tiramisu at a fraction of the price and in the comfort of your own home, with plenty of leftovers to share. This is the recipe you have been looking for.
Watch the video and follow the instructions below to have a slice of Biscoff Tiramisu ready to impress your friends and family today. Like and share this or any of my recipes you find interesting from my growing catalogue of menu selections. Don’t forget to hit the subscribe button to stay up to date on all the latest eatfoodlicious publications. Elegance meets simplicity to create perfection that make this delicious dessert an absolute must try. Thanks for visiting and see you again soon. (disclaimer: recipe contains raw eggs, follow my instructions and practice sanitary preparation techniques for ideal results.)
Please follow Facebook, Instagram, Twitter , Pinterest, or subscribe to my YouTube channel.

Custard
Fill the pan with 2 cups of water, fit a glass heat proof bowl atop the pan and steam/simmer over the water on a medium heat. Add egg yolks & sugar.

Beat/mix until light pale yellow. Remove bowl from the pan.

Add soft mascarpone cheese to the egg mixture. Mix/stir until smooth and creamy with no lumps. Add biscoff butter spread and mix everything together. Set aside until ready for use.

In a separate large bowl or kitchen-aid mixer: Pour the heavy whipping cream in and whip for 7-10 minutes until stiff peaks begin to form. Slowly add the whipped cream to the custard as you continuously fold them together until consistent and smooth.

Cake
First layer: using 30 biscoff cookies.

Two at a time, dip cookies into the coffee, then transfer to the bottom of your dish (8″ x 8″). Watch video for reference.

Second layer: add half of the custard into the dish atop the dipped cookies. Gently smooth and spread the custard until level.

Third layer: Repeat previous steps as you dip 30 cookies in coffee.

Fourth layer: Place the other half of the custard atop the second layer of cookies. Be sure to level and smooth as you spread the custard for the top/final layer. (wipe any excess custard from the edges of your serving dish). Cover and refrigerate for 8 hours.

Remove tiramisu from the refrigerator. Dust the top of the custard with 1-2 tbsp cocoa powder. Clean edges of serving dish to remove excess powder, this enhances the presentation.

Slice into 9 pieces. Serve & Enjoy!
Recent Posts


Be sure to follow me on Facebook, Instagram, Twitter, Pinterest, YouTube or subscribe to the blog for emails and receive free EatFoodlicious recipes daily.
Share on social media

Biscoff Tiramisu
Rich Biscoff Tiramisu is an elegant dessert that is creamy, sweet and delicious.
Equipment
Ingredients
Custard
- 3 large yolks
- 8 oz Mascarpone cheese
- 1 ½ cups heavy whipping cream
- ¼ cup biscoff butter spread
- ¼ cup granulated sugar
Cake
- 2 (package) 8.8 oz Lotus Biscoff Cookies about 60 cookies
- 1 ½ cups cooled coffee
Garnish
- 1 – 2 tbsp unsweetened cocoa powder
- biscoff cookies
Instructions
Custard
- Fill the pan with 2 cups of water, fit a glass heat proof bowl atop the pan and steam/simmer over the water on a medium heat. Add egg yolks & sugar. Beat/mix until light pale yellow. Remove bowl from the pan.
- Add soft mascarpone cheese to the egg mixture. Mix/stir until smooth and creamy with no lumps. Add biscoff butter spread and mix everything together. Set aside until ready for use.
- In a separate large bowl or kitchen-aid mixer: Pour the heavy whipping cream in and whip for 7-10 minutes until stiff peaks begin to form.
- Slowly add the whipped cream to the custard as you continuously fold them together until consistent and smooth.
Cake
- First layer: using 30 biscoff cookies. Two at a time, dip cookies into the coffee, then transfer to the bottom of your dish (8" x 8"). Watch video for reference.
- Second layer: add half of the custard into the dish atop the dipped cookies. Gently smooth and spread the custard until level.
- Third layer: Repeat previous steps as you dip 30 cookies in coffee.
- Fourth layer: Place the other half of the custard atop the second layer of cookies. Be sure to level and smooth as you spread the custard for the top/final layer. (wipe any excess custard from the edges of your serving dish)
- Cover and refrigerate for 8 hours.
- Remove tiramisu from the refrigerator. Dust the top of the custard with 1-2 tbsp cocoa powder. Clean edges of serving dish to remove excess powder, this enhances the presentation. Slice into 9 pieces.
Serve & Enjoy!
Video
Tried this recipe?Mention @eatfoodlicious or tag #eatfoodlicious!
Dessert Recipes


Italian Recipes


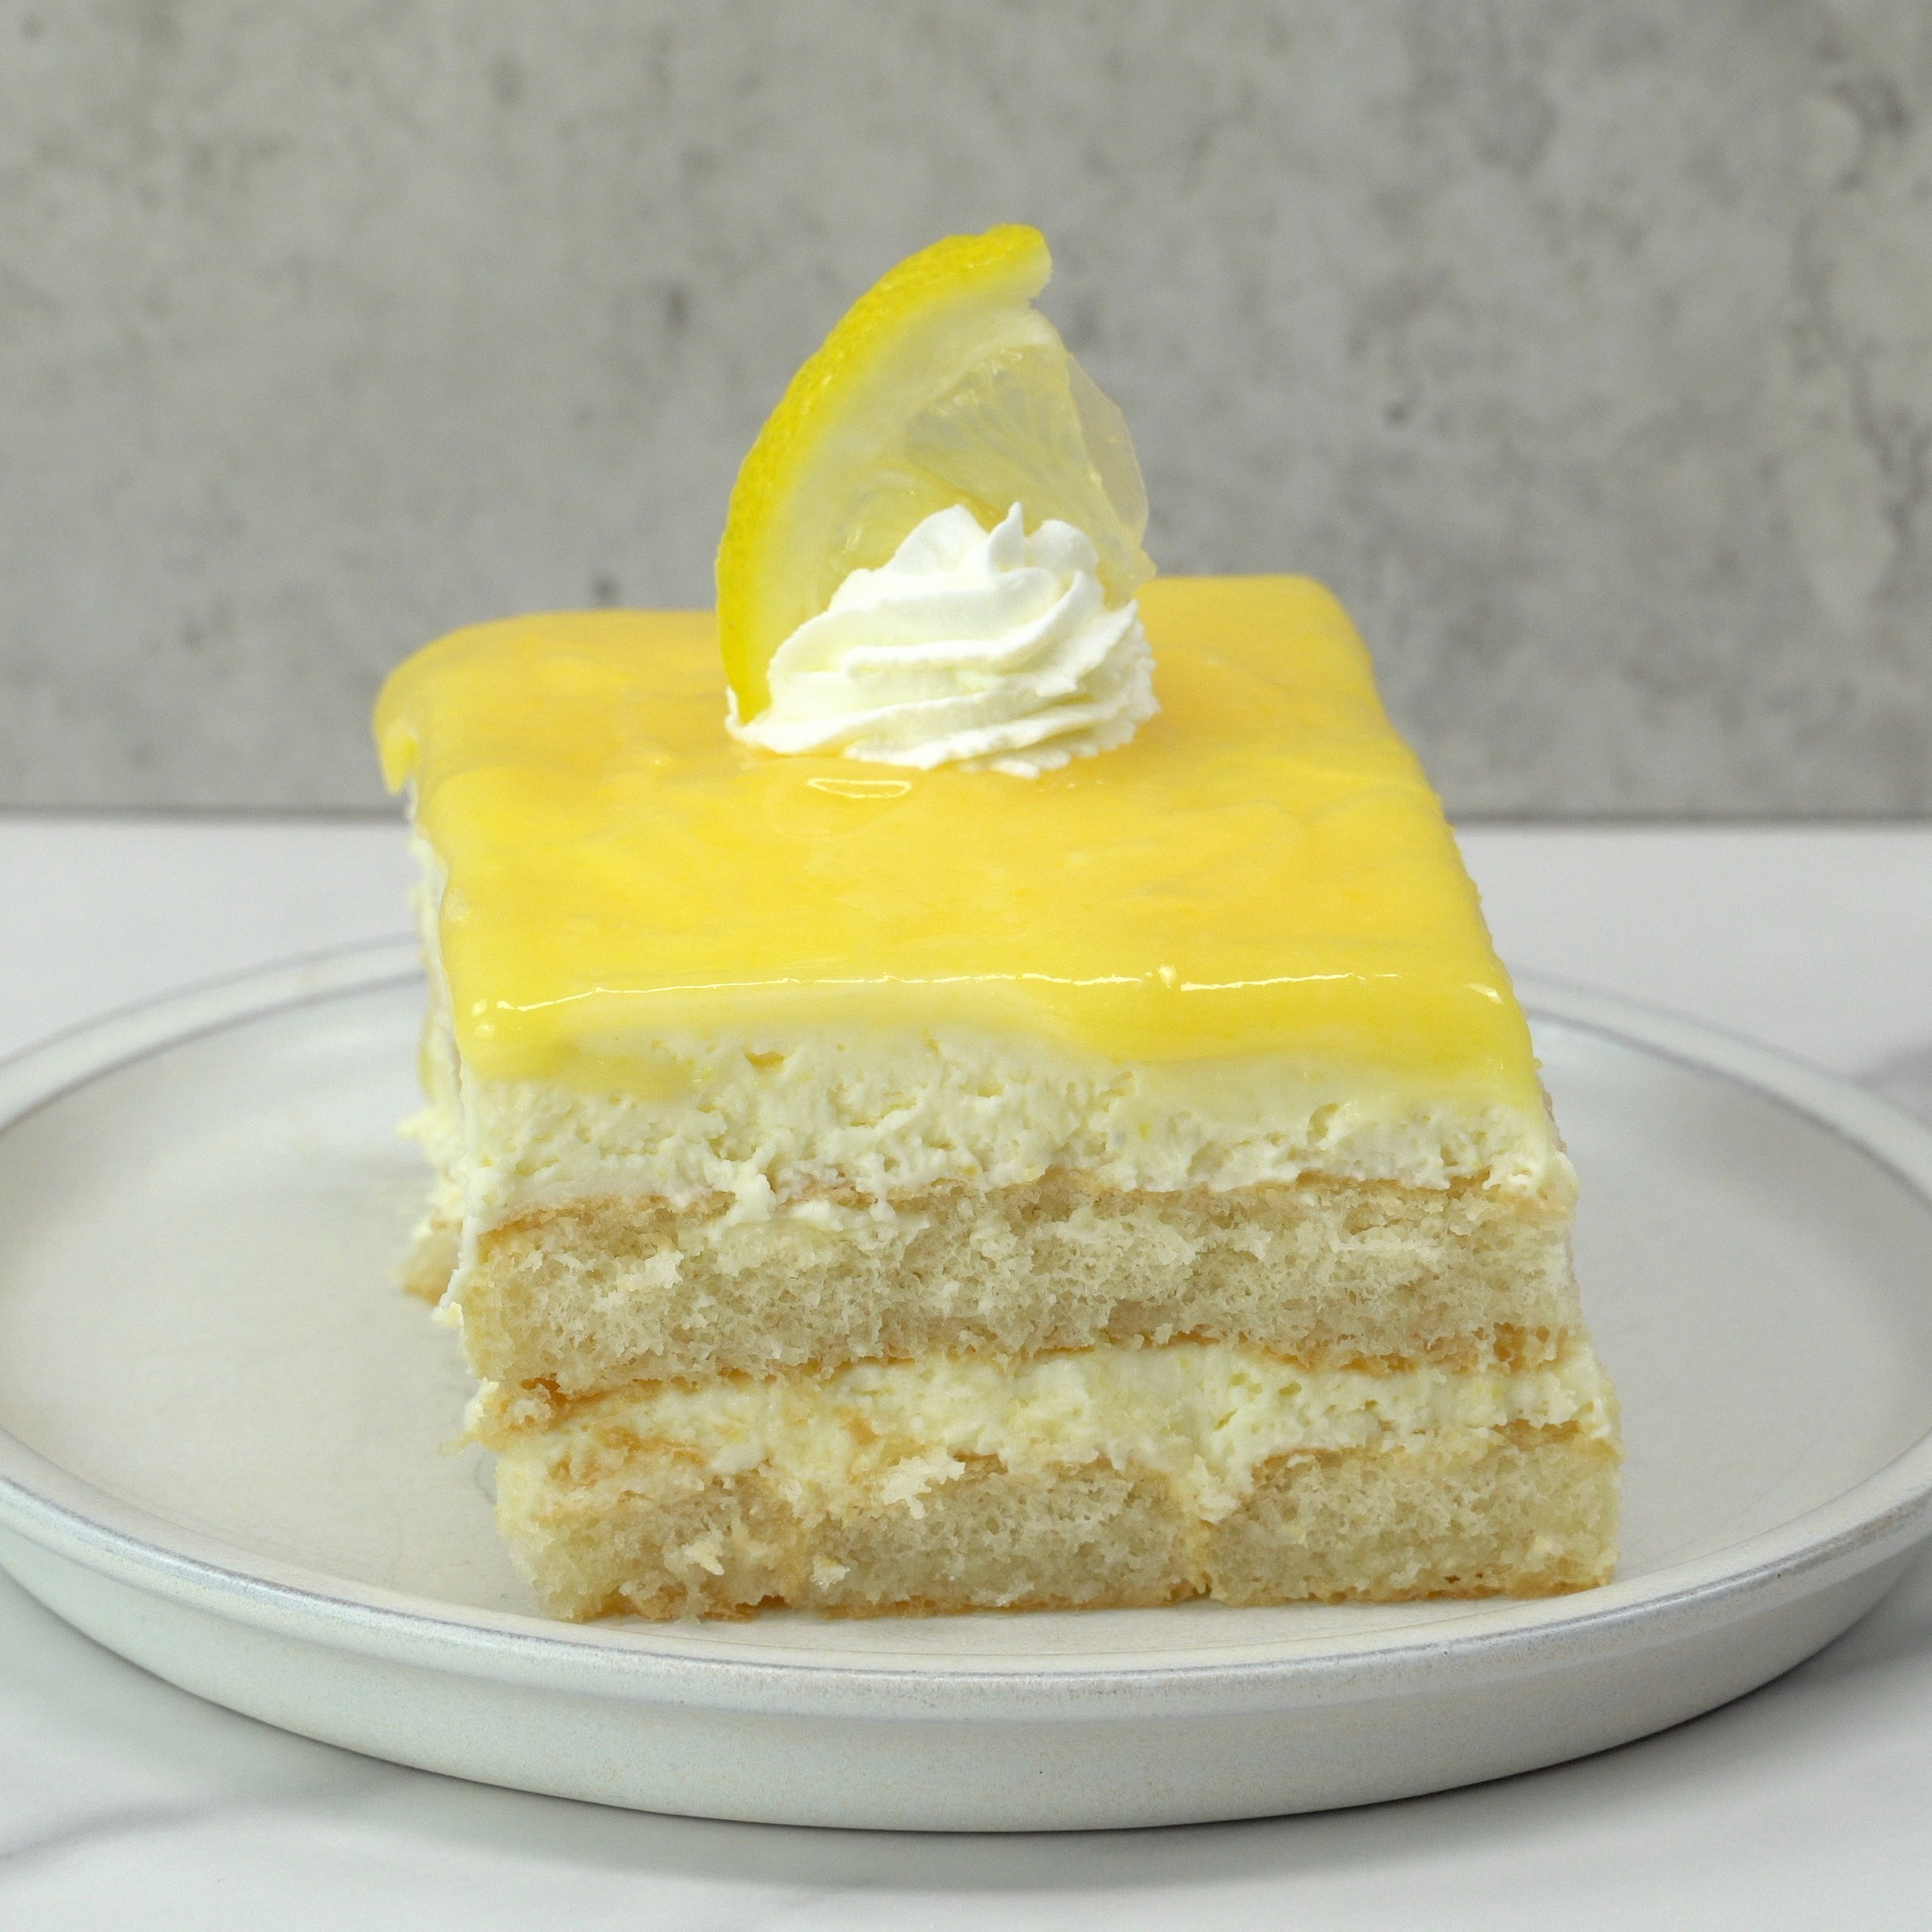
Limoncello Tiramisu with Lemon Curd (Lemon Tiramisu)
Limoncello Tiramisu is very similar to the classic tiramisu but has more of a refreshing fresh lemon taste compared to the traditional coffee flavor. The lady fingers are soaked in Limoncello liqueur with lemon flavored simple syrup. The lemon custard is smooth, slightly sweet and tangy. Lemon Tiramisu features a rich and smooth Lemon Curd that makes for an elegant presentation that is absolutely delicious.
Limoncello Tiramisu with perfectly prepared lady fingers and a creamy style custard, is a gorgeous dessert. Smooth, lemon zest notes swim in a sugary rich lemon curd profile that is balanced by the creamy rich and delicious Italian style custard. I personally enjoy this very much because one of my favorite things is Tiramisu. Full disclosure, this is a fancy dish that requires delicate preparation techniques but are achievable once you watch my video for reference. Perfect as a morning snack or dessert and is awesome with a cup of your favorite tea. This creamy and delicious slice of heaven on earth is worth the preliminary activities to create such a masterful dessert that everyone will love. Have guaranteed fancy restaurant quality Limoncello Tiramisu at a fraction of the price and in the comfort of your own home, with leftovers. This is the recipe you have been looking for.
Watch the video and follow the instructions below to have a slice of Limoncello Tiramisu with Lemon Curd ready to impress your friends and family today. Like and share this or any of my recipes you find interesting from my growing catalogue of menu selections. Don’t forget to hit the subscribe button to stay up to date on all the latest eatfoodlicious publications. Elegant in the simplicity and perfection of the delicious flavors make this dessert an absolute must try. Thanks for visiting and see you again soon. (disclaimer: recipe contains raw eggs, follow my instructions and practice sanitary preparation techniques for ideal results.)
Please follow Facebook, Instagram, Twitter , Pinterest, or subscribe to my YouTube channel.
Lemon Curd

In a sauce pan: add egg yolks, whole eggs, sugar & mix everything. Add lemon juice, lemon zest, salt & stir until well mixed.

Turn up the heat to low and cook for 10-15 minutes until it thickens (make sure to stir frequently). Remove the pan from heat source. Add 8 tbsp of cold butter cubes to the pan and whisk everything together until the butter has fully melted.

Stir continuously until the curd becomes uniform and smooth. You should have about 2 cups of curd. For smooth lemon curd – do not skip this step. Place a mesh/strainer over a right sized bowl. Then pour the custard through the strainer. Cover and refrigerate for at least 7-8 hours.
Lemon Syrup

In a shallow bowl: add sugar & hot water. Whisk until sugar has fully dissolved. Add lemon juice, limoncello & continue to whisk until well mixed. Set aside for at least 30 minutes to allow to cool to room temperature.
Custard

In a separate bowl: add mascarpone cheese, 1 cup of the lemon curd & vanilla extract to the bowl. Then whisk until smooth and creamy with no lumps. Set aside.

Place a large metal bowl and mixing hooks in the freezer prior to the next step for at least 30 minutes. Remove frozen bowl and mixing hooks from the freezer: pour cold heavy whipping cream into the metal bowl and whip with cold hooks for 7-10 minutes until stiff peaks begin to form.

Then add the mascarpone custard using a whisk and fold technique until it becomes consistent and smooth.
Cake

First layer: Using 12 ladyfingers. One at a time, dip both sides of the ladyfingers into the room temperature lemon syrup.

Transfer to the bottom of your

Second layer: Evenly spread half of the custard over the top the dipped lady fingers. Gently smooth and spread the custard until level. Third layer: Repeat and dip both sides of the 12 additional ladyfingers in the lemon syrup.

Fourth layer: Place the other half of the custard atop the second layer of ladyfingers. Be sure to level and smooth as you spread the custard for the top layer. Cover with saran wrap and refrigerate for 8 hours.

The next day- remove the lemon tiramisu from the refrigerator and discard the saran wrap. Spread the remaining 1 cup of lemon curd over the top layer of custard.

Serve and enjoy!
Recent Posts


Be sure to follow me on Facebook, Instagram, Twitter, Pinterest, YouTube or subscribe to the blog for emails and receive free EatFoodlicious recipes daily.
Share on social media

Lemon Tiramisu with Lemon Curd
Lemon Tiramisu features a rich and smooth Lemon Curd that makes for an elegant presentation that is absolutely delicious.
Equipment
- 8" x 8" Square pan
Ingredients
Lemon Curd
- 4 large eggs yolks room temperature
- 2 whole large eggs room temperature
- 1 cup extra fine granulated sugar
- ½ cup lemon juice
- 2 tbsp lemon zest
- ¼ tsp salt
- 8 tbsp unsalted buter cold
Lemon Syrup
- ⅔ cup hot water
- ⅓ cup sugar
- ½ cup lemon juice
- ¼ cup Limoncello Liqueur optional
Custard
- 8 oz mascarpone cheese room temperature
- 1 ½ cups heavy whipping cream cold
- 1 tsp vanilla extract
Cake
- 24 lady fingers 7 oz package
Whipping Cream
- 1 cup heavy whipping cream cold
- 2 tbsp confectioner sugar/ powdered sugar
Instructions
Lemon Curd
- In a sauce pan: add egg yolks, whole eggs, sugar & mix everything. Add lemon juice, lemon zest, salt & stir until well mixed. Turn up the heat to low and cook for 10-15 minutes until it thickens (make sure to stir frequently). Remove the pan from heat source. Add 8 tbsp of cold butter cubes to the pan and whisk everything together until the butter has fully melted. Stir continuously until the curd becomes uniform and smooth. You should have about 2 cups of curd.
- For smooth lemon curd – do not skip this step. Place a mesh/strainer over a right sized bowl. Then pour the custard through the strainer. Cover and refrigerate for at least 7-8 hours.
Lemon Syrup
- In a shallow bowl: add sugar & hot water. Whisk until sugar has fully dissolved. Add lemon juice, limoncello & continue to whisk until well mixed. Set aside for at least 30 minutes to allow to cool to room temperature.
Custard
- In a separate bowl: add mascarpone cheese, 1 cup of the lemon curd & vanilla extract to the bowl. Then whisk until smooth and creamy with no lumps. Set aside.
- Place a large metal bowl and mixing hooks in the freezer prior to the next step for at least 30 minutes. Remove frozen bowl and mixing hooks from the freezer: pour cold heavy whipping cream into the metal bowl and whip with cold hooks for 7-10 minutes until stiff peaks begin to form. Then add the mascarpone custard using a whisk and fold technique until it becomes consistent and smooth.
Cake
- First layer: Using 12 ladyfingers. One at a time, dip both sides of the ladyfingers into the room temperature lemon syrup and transfer to the bottom of your serving dish (8" x 8").
- Second layer: Evenly spread half of the custard over the top the dipped lady fingers. Gently smooth and spread the custard until level.
- Third layer: Repeat and dip both sides of the 12 additional ladyfingers in the lemon syrup.
- Fourth layer: Place the other half of the custard atop the second layer of ladyfingers. Be sure to level and smooth as you spread the custard for the top layer. Cover with saran wrap and refrigerate for 8 hours.
- The next day- remove the lemon tiramisu from the refrigerator and discard the saran wrap. Spread the remaining 1 cup of lemon curd over the top layer of custard.
Whipping Cream
- In a bowl (freeze bowl with hooks for 30 minutes prior to use): add cold heavy whipping cream & powdered sugar. Beat on medium until soft peaks form. Place the cream in a tipped pastry bag. Then decorate each tiramisu square with cream & a slice of lemon just prior to serving.
Serve and enjoy! Store the leftovers in the refrigerator for up to 3 days.
Video
Tried this recipe?Mention @eatfoodlicious or tag #eatfoodlicious!
Dessert Recipes


Italian Recipes


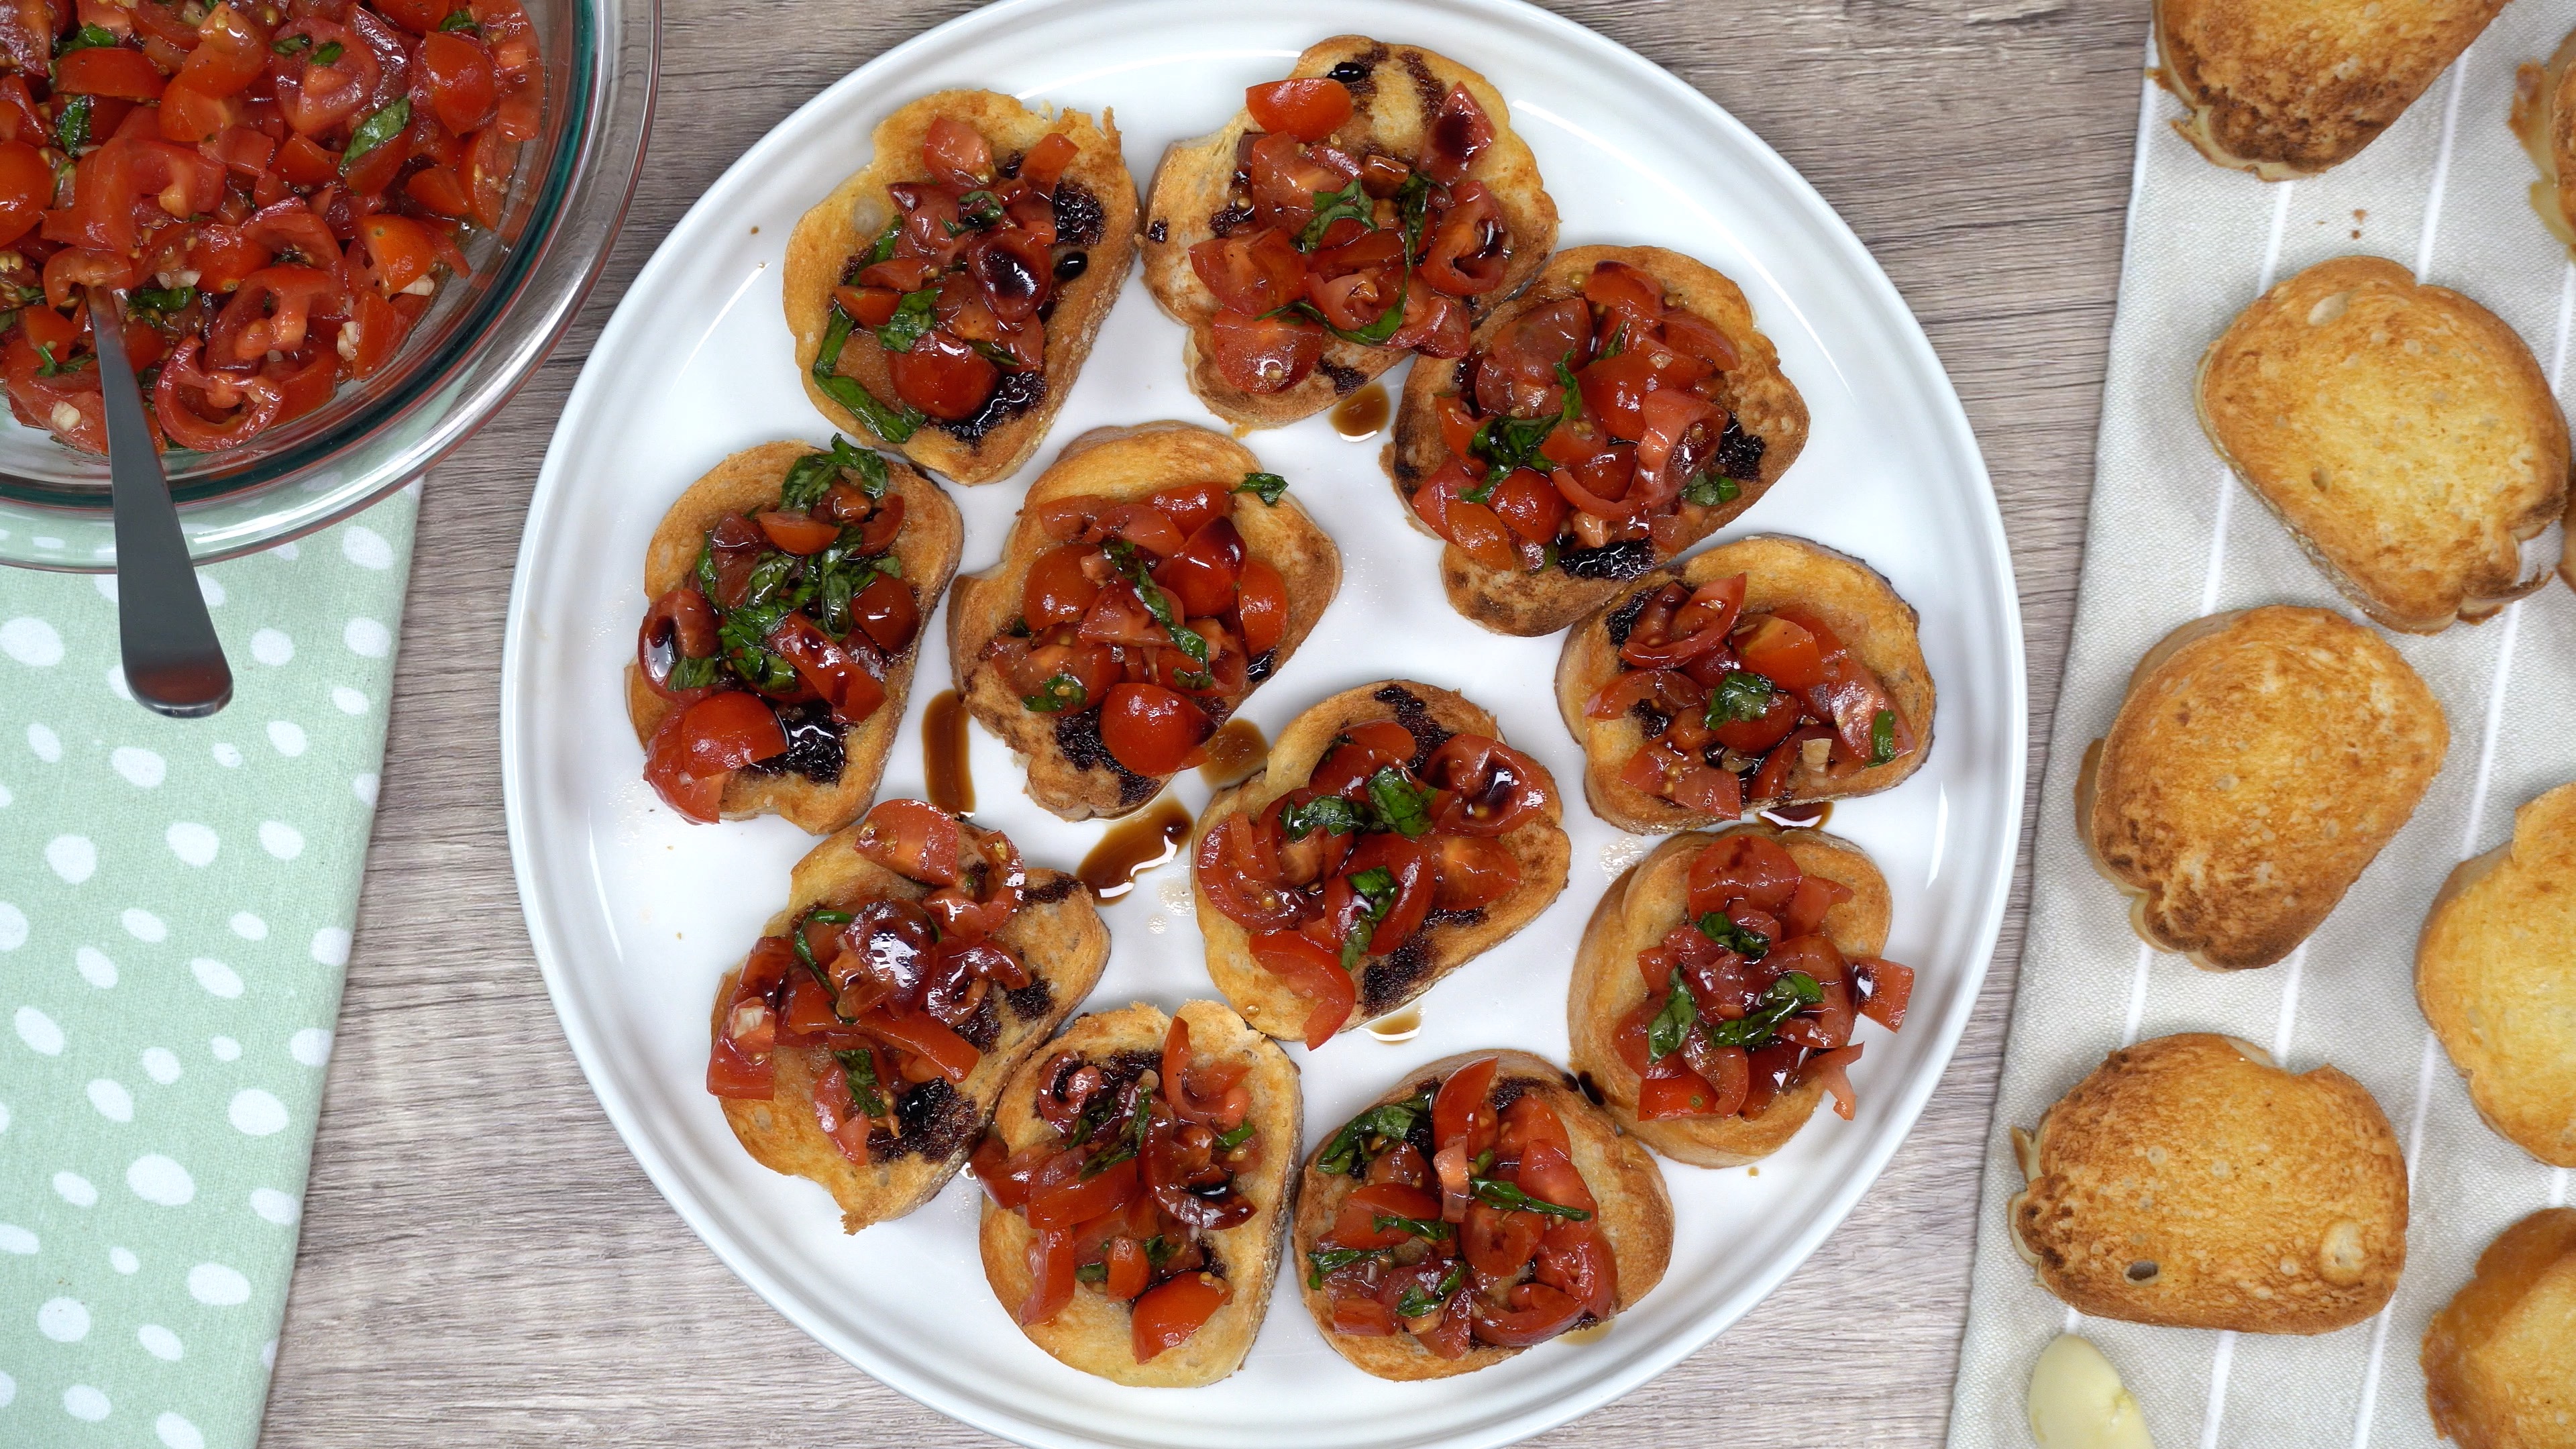
Cherry Tomato Bruschetta
Sweet Cherry Tomato Bruschetta is a delicious appetizer or snack that is so simple to make, anyone can do it. Fresh sliced Cherry tomatoes are very delicious and take the perfect Bruschetta. The freshness and natural flavors burst with juices that make the store bought version seem very generic in comparison. Serve on a nice piece of toasted bread or fresh cracker for a wonderful snack durning a light lunch or as an appetizer with a main entree. Delicious tasty and good to the last bite. This affordable and easy to make selection is perfect for beginners or as a personal treat to enhance a meals presentation. Full of natural flavor and sweetness this is a budget friendly recipe. We enjoy this simple recipe pretty often and recommend you try it at least once to see for yourself how delicious it really is.
Watch the video and follow the instructions below to have Fresh homemade Cherry Tomato Bruschetta bursting with sweet natural juices today. Like and share this or any of my recipes you find interesting from my growing catalogue of menu selections. Don’t forget to hit the subscribe button to stay up to date on all the latest eatfoodlicious publications. The best bread for bruschetta will have a nice firm crust and is sturdy enough to hold the Cherry Tomato Bruschetta topping. My personal favorite is French bread but Italian and Ciabatta are a bit more traditional. Thanks for visiting and see you again soon.
Please follow Facebook, Instagram, Twitter , Pinterest, or subscribe to my YouTube channel.

In a bowl: add chopped cherry tomatoes, chopped basil, minced garlic, olive oil, salt, pepper, balsamic vinegar and mix everything together.

Season with salt & pepper if needed. Cover and refrigerate for at least 30 minutes.

Slice baguette or French bread. Coat both sides with olive oil. Broil in the oven for 1-2 minutes per/side. Let cool for 5 minutes.

Rub garlic clove on the toast. Watch the video for reference.

Drizzle balsamic glaze over bruschetta and toast.

Enjoy!
Recent Posts


Be sure to follow me on Facebook, Instagram, Twitter, Pinterest, YouTube or subscribe to the blog for emails and receive free EatFoodlicious recipes daily.
Share on social media

Cherry Tomato Bruschetta
Fresh Cherry Tomato Bruschetta is refreshing, sweet and full of natural savory juices.
Ingredients
- 1 pint cherry tomatoes cut into pieces
- ¼ cup fresh basil leaves chopped
- 3 tbsp extra virgin olive oil
- 2 tbsp balsamic vinegar
- ½ tsp salt
- ¼ tsp black pepper
- 2 garlic cloves minced
- 1 baguette sliced
- balsamic glaze
- 1 garlic clove
Instructions
- In a bowl: add chopped cherry tomatoes, chopped basil, minced garlic, olive oil, salt, pepper, balsamic vinegar and mix everything together. Season with salt & pepper if needed. Cover and refrigerate for at least 30 minutes.
- Slice baguette or French bread. Coat both sides with olive oil. Broil in the oven for 1-2 minutes per/side. Let cool for 5 minutes. Rub garlic clove on the toast. Watch the video for reference.
- Drizzle balsamic glaze over bruschetta and toast.
Serve & Enjoy!
Video
Tried this recipe?Mention @eatfoodlicious or tag #eatfoodlicious!
Appetizer & Snacks


Healthy Recipes


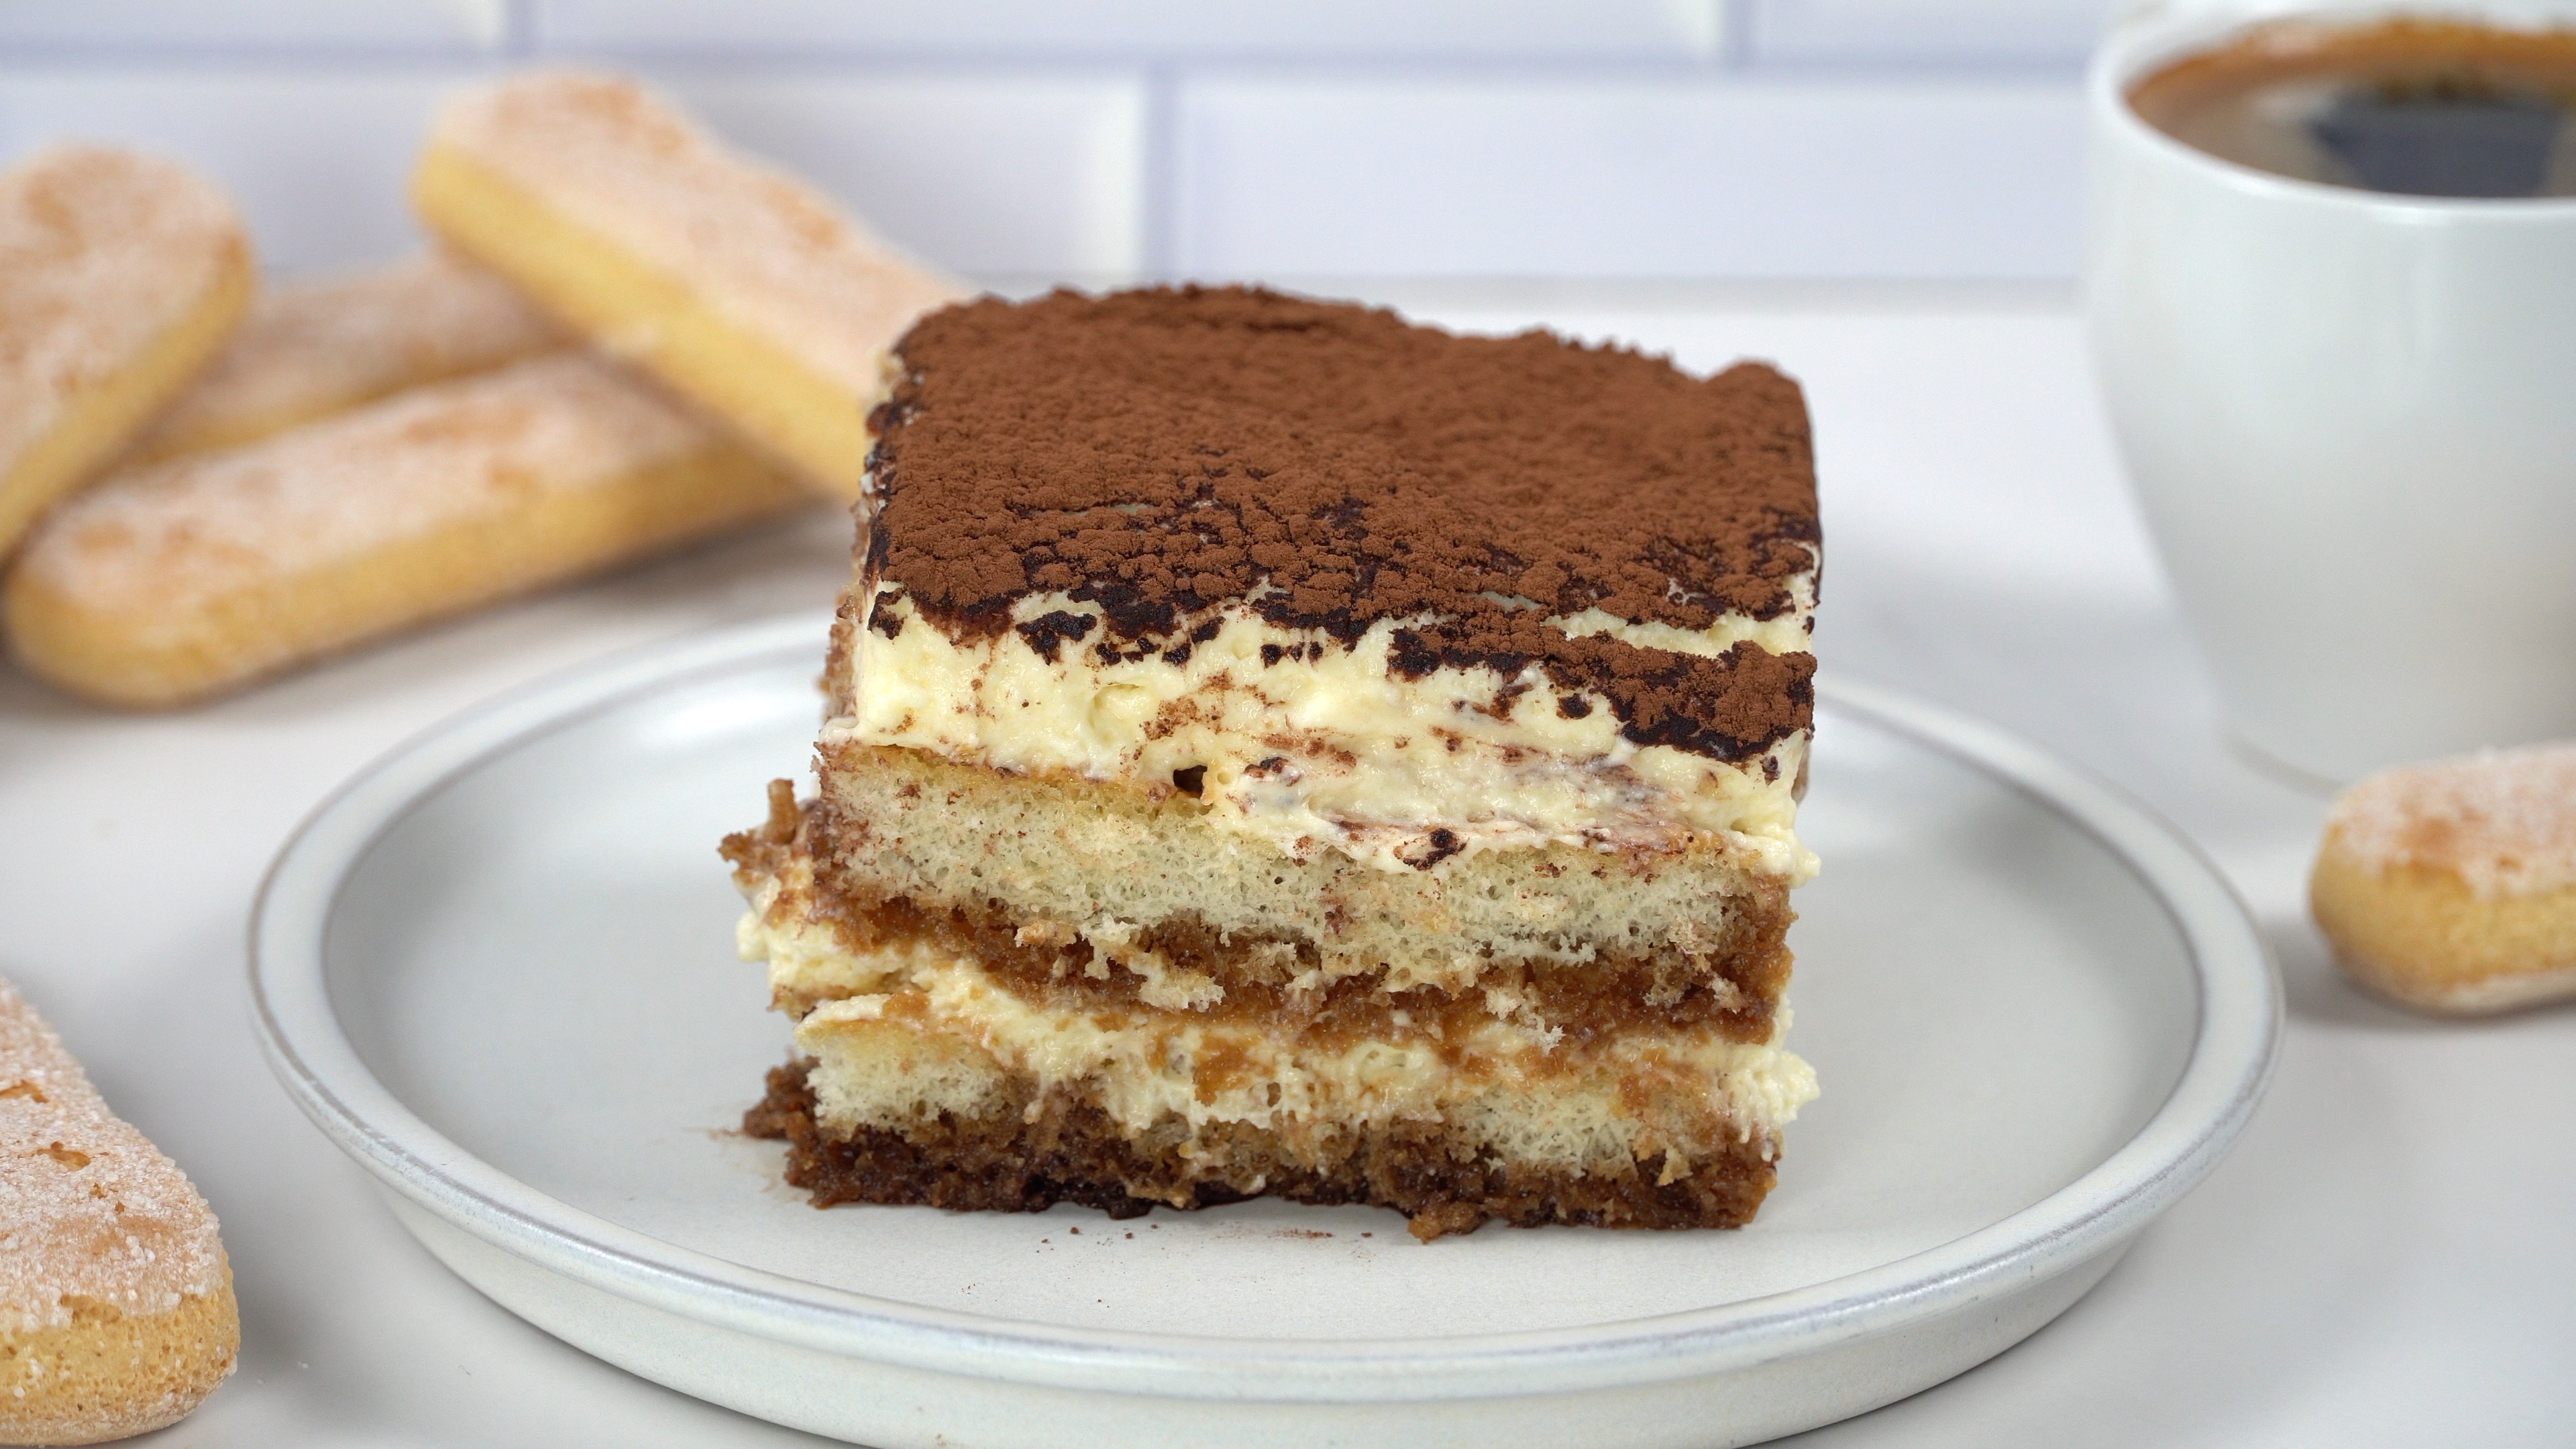
Classic Tiramisu (Italian)
Classic Tiramisu with perfectly prepared lady fingers and a creamy style custard, is a gorgeous dessert. Smooth, chocolatey notes swim in a sugary rich coffee profile that is balanced by the creamy rich and delicious Italian style custard. I personally enjoy this very much because one of my favorite things is Tiramisu. Full disclosure, this is a fancy dish that requires delicate preparation techniques but are achievable once you watch my video for reference. I have had Tiramisu from grocery stores and high end restaurants alike and very seldom find one that captures the intent of the classic recipe. I am very proud to share this recipe and highly recommend you give it a try. Perfect as a morning snack or dessert and is awesome with a cup of your favorite coffee. This creamy and delicious slice of heaven on earth is worth the preliminary activities to create such a masterful dessert that everyone will love. Have guaranteed fancy restaurant quality Classic Tiramisu at a fraction of the price and in the comfort of your own home, with leftovers. This is the recipe you have been looking for.
Watch the video and follow the instructions below to have a slice of Classic Tiramisu ready to impress your friends and family today. Like and share this or any of my recipes you find interesting from my growing catalogue of menu selections. Don’t forget to hit the subscribe button to stay up to date on all the latest eatfoodlicious publications. Elegant in the simplicity and perfection of the delicious flavors make this dessert an absolute must try. Thanks for visiting and see you again soon. (disclaimer: recipe contains raw eggs, follow my instructions and practice sanitary preparation techniques for ideal results.)
Please follow Facebook, Instagram, Twitter , Pinterest, or subscribe to my YouTube channel.

Classic Tiramisu that features a rich and creamy Italian style custard with espresso soaked lady fingers that is worthy of any fancy restaurant and is absolutely intoxicating.

4 large egg yolks

Add sugar

Combine egg yolks and ¼ cup of sugar. Beat for 3-4 minutes or until smooth and light yellow.

Add mascarpone cheese to the egg mixture.

Mix/stir until smooth and creamy with no lumps to form the custard. Set aside until ready for use.

In a separate large bowl or kitchen-aid mixer: add the egg whites and whip for 4-5 minutes until slightly stiff peaks begin to form. Continue to whip while adding 2 tbsp sugar to the bowl, then add the other 2 tbsp of sugar while whipping until stiff peaks.

Use a spatula and fold the ¼ of the egg whites into the egg yolk mixture. Repeat this step 3 more times and fold them together until consistent and smooth.

Dust the bottom of the pan with cocoa powder.

In a shallow dish: combine coffee (cooled) and marsala wine or coffee liqueur and mix.

First layer: using 12 ladyfingers. One at a time, dip one side of the ladyfinger into the coffee mixture, then transfer to the bottom of your dish (8″ x 8″). Watch video for reference. Second layer: add half of the custard into the dish atop the dipped lady fingers.

Gently smooth and spread the custard until level.

Third layer: Repeat previous steps as you dip 12 additional ladyfingers in coffee.

Fourth layer: Place the other half of the custard atop the second layer of ladyfingers. Be sure to level and smooth as you spread the custard for the top/final layer (wipe any excess custard from the edges of your serving dish). Cover and refrigerate for 8 hours.

Remove tiramisu from the refrigerator. Dust the top of th custard with cocoa powder. Clean edges of serving dish to remove excess powder, this enhances the presentation.
Slice into 9 pieces.
Recent Posts


Be sure to follow me on Facebook, Instagram, Twitter, Pinterest, YouTube or subscribe to the blog for emails and receive free EatFoodlicious recipes daily.
Share on social media

Classic Tiramisu (Italian Style)
Classic Tiramisu that features a rich and creamy Italian style custard with espresso soaked lady fingers that is worthy of any fancy restaurant and is absolutely intoxicating.
Equipment
- 8" x 8" Glass Square pan
Ingredients
- 1 ½ cups strong coffee or espresso cool
- 1 cup Mascarpone cheese 8 oz
- ½ cup (divided) granulated sugar
- 2 tbsp Marsala wine or coffee liqueur optional: cognac, rum or brandy
- 24 ladyfingers 7 oz package
- 4 large eggs Separated
- 3 tbsp (divided) unsweetened cocoa powder
Instructions
- In a medium bowl: Combine 4 egg yolks and ¼ cup of sugar. Beat for 3-4 minutes or until smooth and light yellow. Add mascarpone cheese to the egg mixture. Mix/stir until smooth and creamy with no lumps to form the custard. Set aside until ready for use.
- In a separate large bowl or kitchen-aid mixer: add the 4 egg whites and whip for 4-5 minutes until soft peaks begin to form. Continue to whip while adding 2 tbsp sugar to the bowl, then add the other 2 tbsp of sugar while whipping until stiff peaks.
- Use a spatula and fold the ¼ of the egg whites into the egg yolk mixture. Repeat this step 3 more times and fold them together until consistent and smooth.
- In a shallow dish: combine coffee (cooled) and marsala wine or coffee liqueur and mix.
Cake
- Dust the bottom of the pan with 1 tbsp cocoa powder. First layer: using 12 ladyfingers. One at a time, dip one side of the ladyfinger into the coffee mixture, then transfer to the bottom of your dish (8" x 8"). Watch video for reference.
- Second layer: add half of the custard into the dish atop the dipped lady fingers. Gently smooth and spread the custard until level.
- Third layer: Repeat previous steps as you dip 12 additional ladyfingers in coffee.
- Fourth layer: Place the other half of the custard atop the second layer of ladyfingers. Be sure to level and smooth as you spread the custard for the top/final layer. (wipe any excess custard from the edges of your serving dish)
- Cover and refrigerate for 8 hours.
- Remove tiramisu from the refrigerator. Dust the top of the custard with 2 tbsp cocoa powder. Clean edges of serving dish to remove excess powder, this enhances the presentation. Slice into 9 pieces.
Serve & Enjoy!
Video
Tried this recipe?Mention @eatfoodlicious or tag #eatfoodlicious!
Italian Recipes


Dessert Recipes


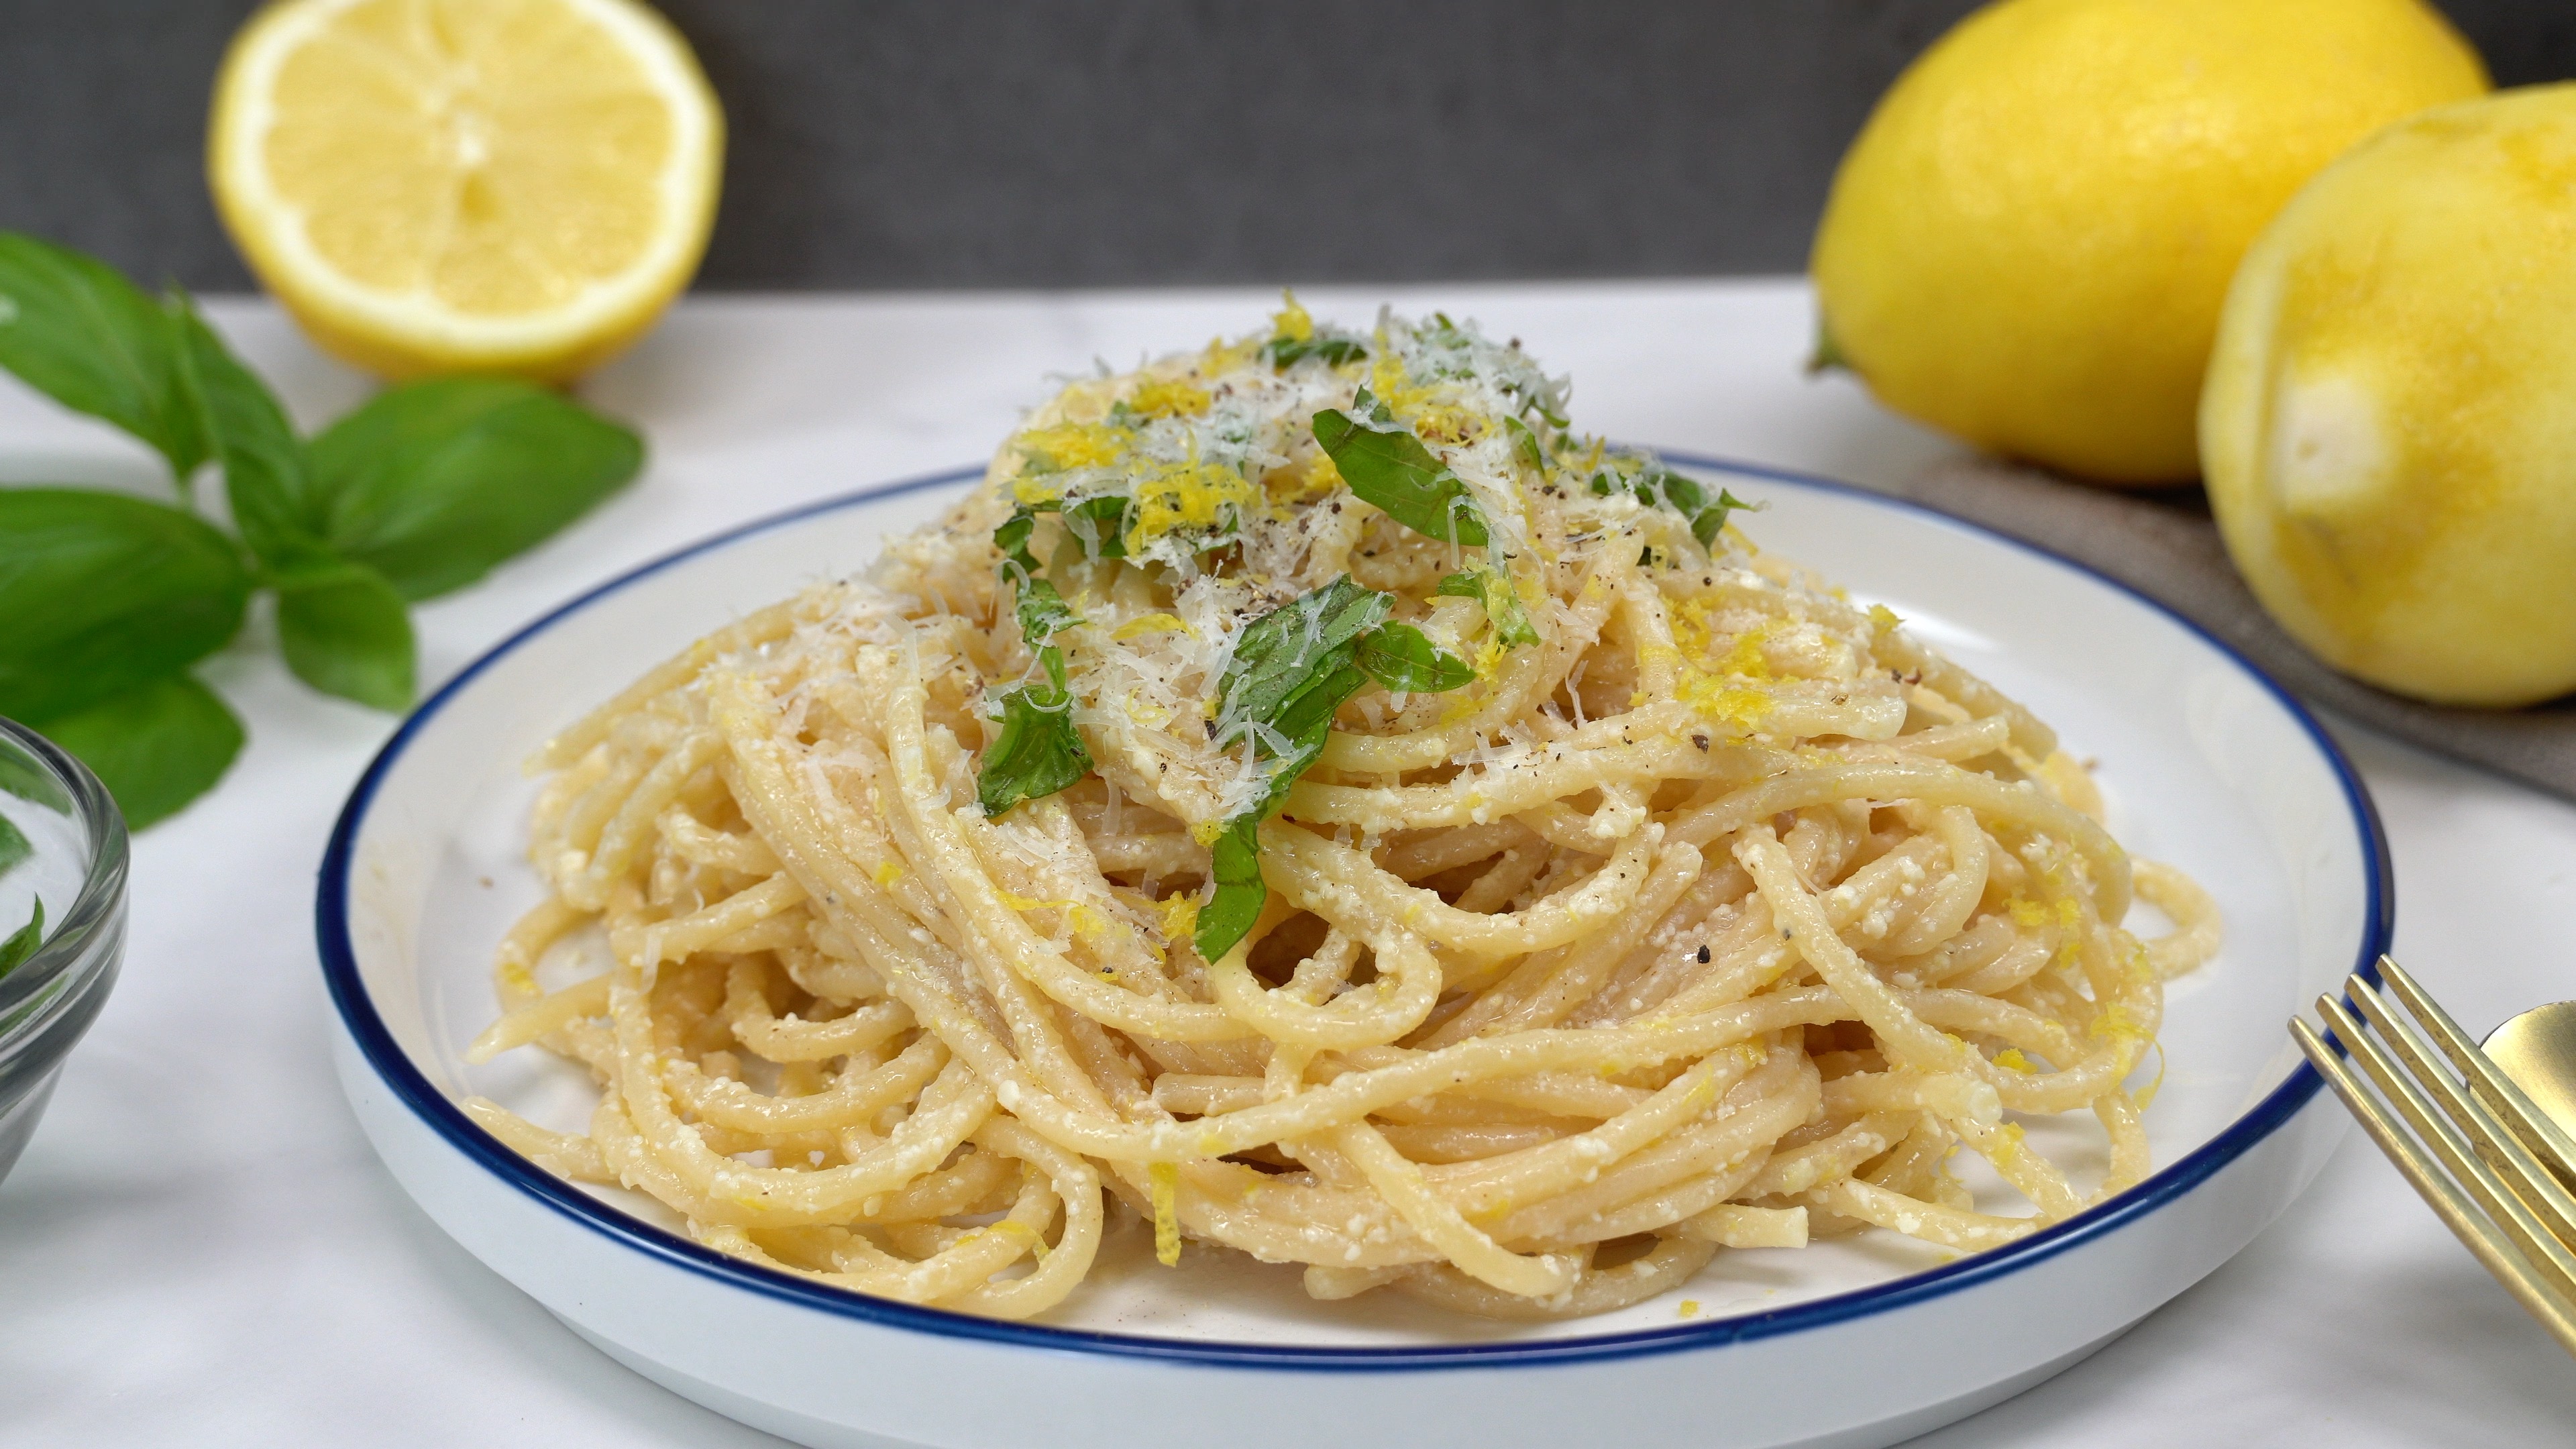
Pasta al Limone (Lemon Pasta)
Delicious homemade Pasta al Limone is zesty, juicy, tender and very flavorful. This is a great side dish or comfort meal that is extremely tasty and fun to eat. Authentic natural favors make this Lemon Pasta a definite “must try.” Pasta is a very affordable item to have in the pantry and has near infinite possibilities and combination of flavors. This approach is simple, easy to follow and very refreshing to enjoy as a summer lunch item. The meal itself is not heavy with grease and make you feel good about the meal selection. Add some refreshing flavors to a bundle of pasta by following this easy recipe for a nice change to this weeks meal plan.
Watch the video, follow the instructions below to prepare something new/different for those you share your table and life with. Don’t forget to hit the subscribe button to stay up to date on all the latest publications. Like and share this or any of my videos you may find interesting form the growing catalogue of selections. Wonderfully well-flavored, delicious tender pasta that is brought to eatable perfection through the gentle kiss of a well developed recipe that will bring joy and satisfaction to your next eatfoodlicious experience. Lemon Pasta is a nice guilt free meal that everyone will enjoy. The taste and texture is satisfying and filling. I hope you enjoy this selections as much as we do.
Please follow Facebook, Instagram, Twitter , Pinterest, or subscribe to my YouTube channel.

Follow the instructions on the package for pasta cook time (al dente). Then reserve about ½ cup of the pasta water. Drain noodles and return to the pot. Add butter and mix until the butter is fully melted.

In a large bowl: combine olive oil, lemon juice, lemon zest & grated Parmesan cheese.

Mix

Transfer the butter noodles to the lemon mixture. Mix everything together. Season with salt & pepper as needed.

Optional: add chopped fresh basil leaves.
Garnish with more parmesan cheese & lemon zest. Serve & enjoy!
Recent Posts


Be sure to follow me on Facebook, Instagram, Twitter, Pinterest, YouTube or subscribe to the blog for emails and receive free EatFoodlicious recipes daily.
Share on social media

Lemon Pasta (Limone)
Quick & Easy Zesty Lemon Pasta is full of natural tart flavors and is deliciously refreshing.
Ingredients
- 8 oz spaghetti noodles
- ⅓ cup grated Parmesan cheese
- ¼ cup extra virgin olive oil
- ¼ cup lemon juice
- 3 tbsp unsalted butter
- 1 tbsp lemon zest
Instructions
- Follow the instructions on the package for pasta cook time (al dente). Then reserve about ½ cup of the pasta water.
- In a large bowl: combine olive oil, lemon juice, lemon zest, grated Parmesan cheese and mix.
- Drain noodles and return to the pot. Add butter and mix until the butter is fully melted. Transfer the butter noodles to the lemon mixture. Mix everything together. Season with salt & pepper as needed.
- Optional: add chopped fresh basil leaves.
Garnish with more parmesan cheese & lemon zest. Serve & enjoy!
Video
Tried this recipe?Mention @eatfoodlicious or tag #eatfoodlicious!
Pasta Recipes


Italian Recipes

Classic Marinara Sauce
Classic Marinara Sauce in an easy to follow recipe that is delicious on pasta or as a dip for your favorite pizza crust. This sauce is perfect for family style gatherings that require some Italian flavors and can be made with little preliminary activities. The entire family will be glad this sauce made it to the table in your next Italian inspired feast. Smooth and subtle Italian notes fun of fresh basil fragrances make this sauce restaurant quality in the comfort of the your own home. I enjoyed this recipe and recommend you try it at least once to see for yourself how delicious it really is.
Watch the video and follow the instructions below to have this easy to make Classic Marinara Sauce today. Like and share this or any of my recipes you find interesting from my growing catalogue of menu selections. Don’t forget to hit the subscribe button to stay up to date on all the latest eatfoodlicious publications. Smooth, fresh tasting Classic Marinara Sauce every one will enjoy. Thanks for visiting and see you again soon.
Please follow Facebook, Instagram, Twitter , Pinterest, or subscribe to my YouTube channel.

In a large bowl: add whole San Marzano tomatoes with juice. Use hands to crush the tomatoes. Add water to the tomato can, stir and set aside.

Heat a sauce pan to medium heat. Add olive oil and wait for 30-35 seconds or until hot. Add minced garlic and sauté for 1-2 minutes or until fragrant.

Add crushed tomatoes & water from the can

Add salt, sugar, red pepper flakes and mix everything together.

Add basil leaves and mix (submerge the leaves in the sauce).

Simmer for 25 minutes or until the sauce has thicken.

Sauce should be enough for 1 lb of spaghetti noodles. Serve & Enjoy!
Recent Posts


Be sure to follow me on Facebook, Instagram, Twitter, Pinterest, YouTube or subscribe to the blog for emails and receive free EatFoodlicious recipes daily.
Share on social media

Classic Marinara Sauce
Classic Marinara Sauce made with fresh ingredients that is the perfect dip or sauce to enhance your next Italian style feast.
Ingredients
- 28 oz Whole San Marzano Tomatoes
- 1 cup water
- ¼ cup extra virgin olive oil
- 1 tsp salt
- 1 tsp sugar
- ¼ – ½ tsp red pepper flakes
- ½ – ¾ cup fresh basil leaves
- 6 garlic cloves minced
Instructions
- In a large bowl: add whole San Marzano tomatoes with juice. Use hands to crush the tomatoes. Add water to the tomato can, stir and set aside.
- Heat a sauce pan to medium heat. Add olive oil and wait for 30-35 seconds or until hot.
- Add minced garlic and sauté for 1-2 minutes or until fragrant. Add crushed tomatoes, water from the can, salt, sugar, red pepper flakes and mix everything together. Add basil leaves and mix (submerge the leaves in the sauce).
- Simmer for 25 minutes or until the sauce has thicken. Sauce should be enough for 1 lb of spaghetti noodles.
Serve & Enjoy!
Video
Tried this recipe?Mention @eatfoodlicious or tag #eatfoodlicious!
Italian Recipes
Pasta & Noodle Recipes


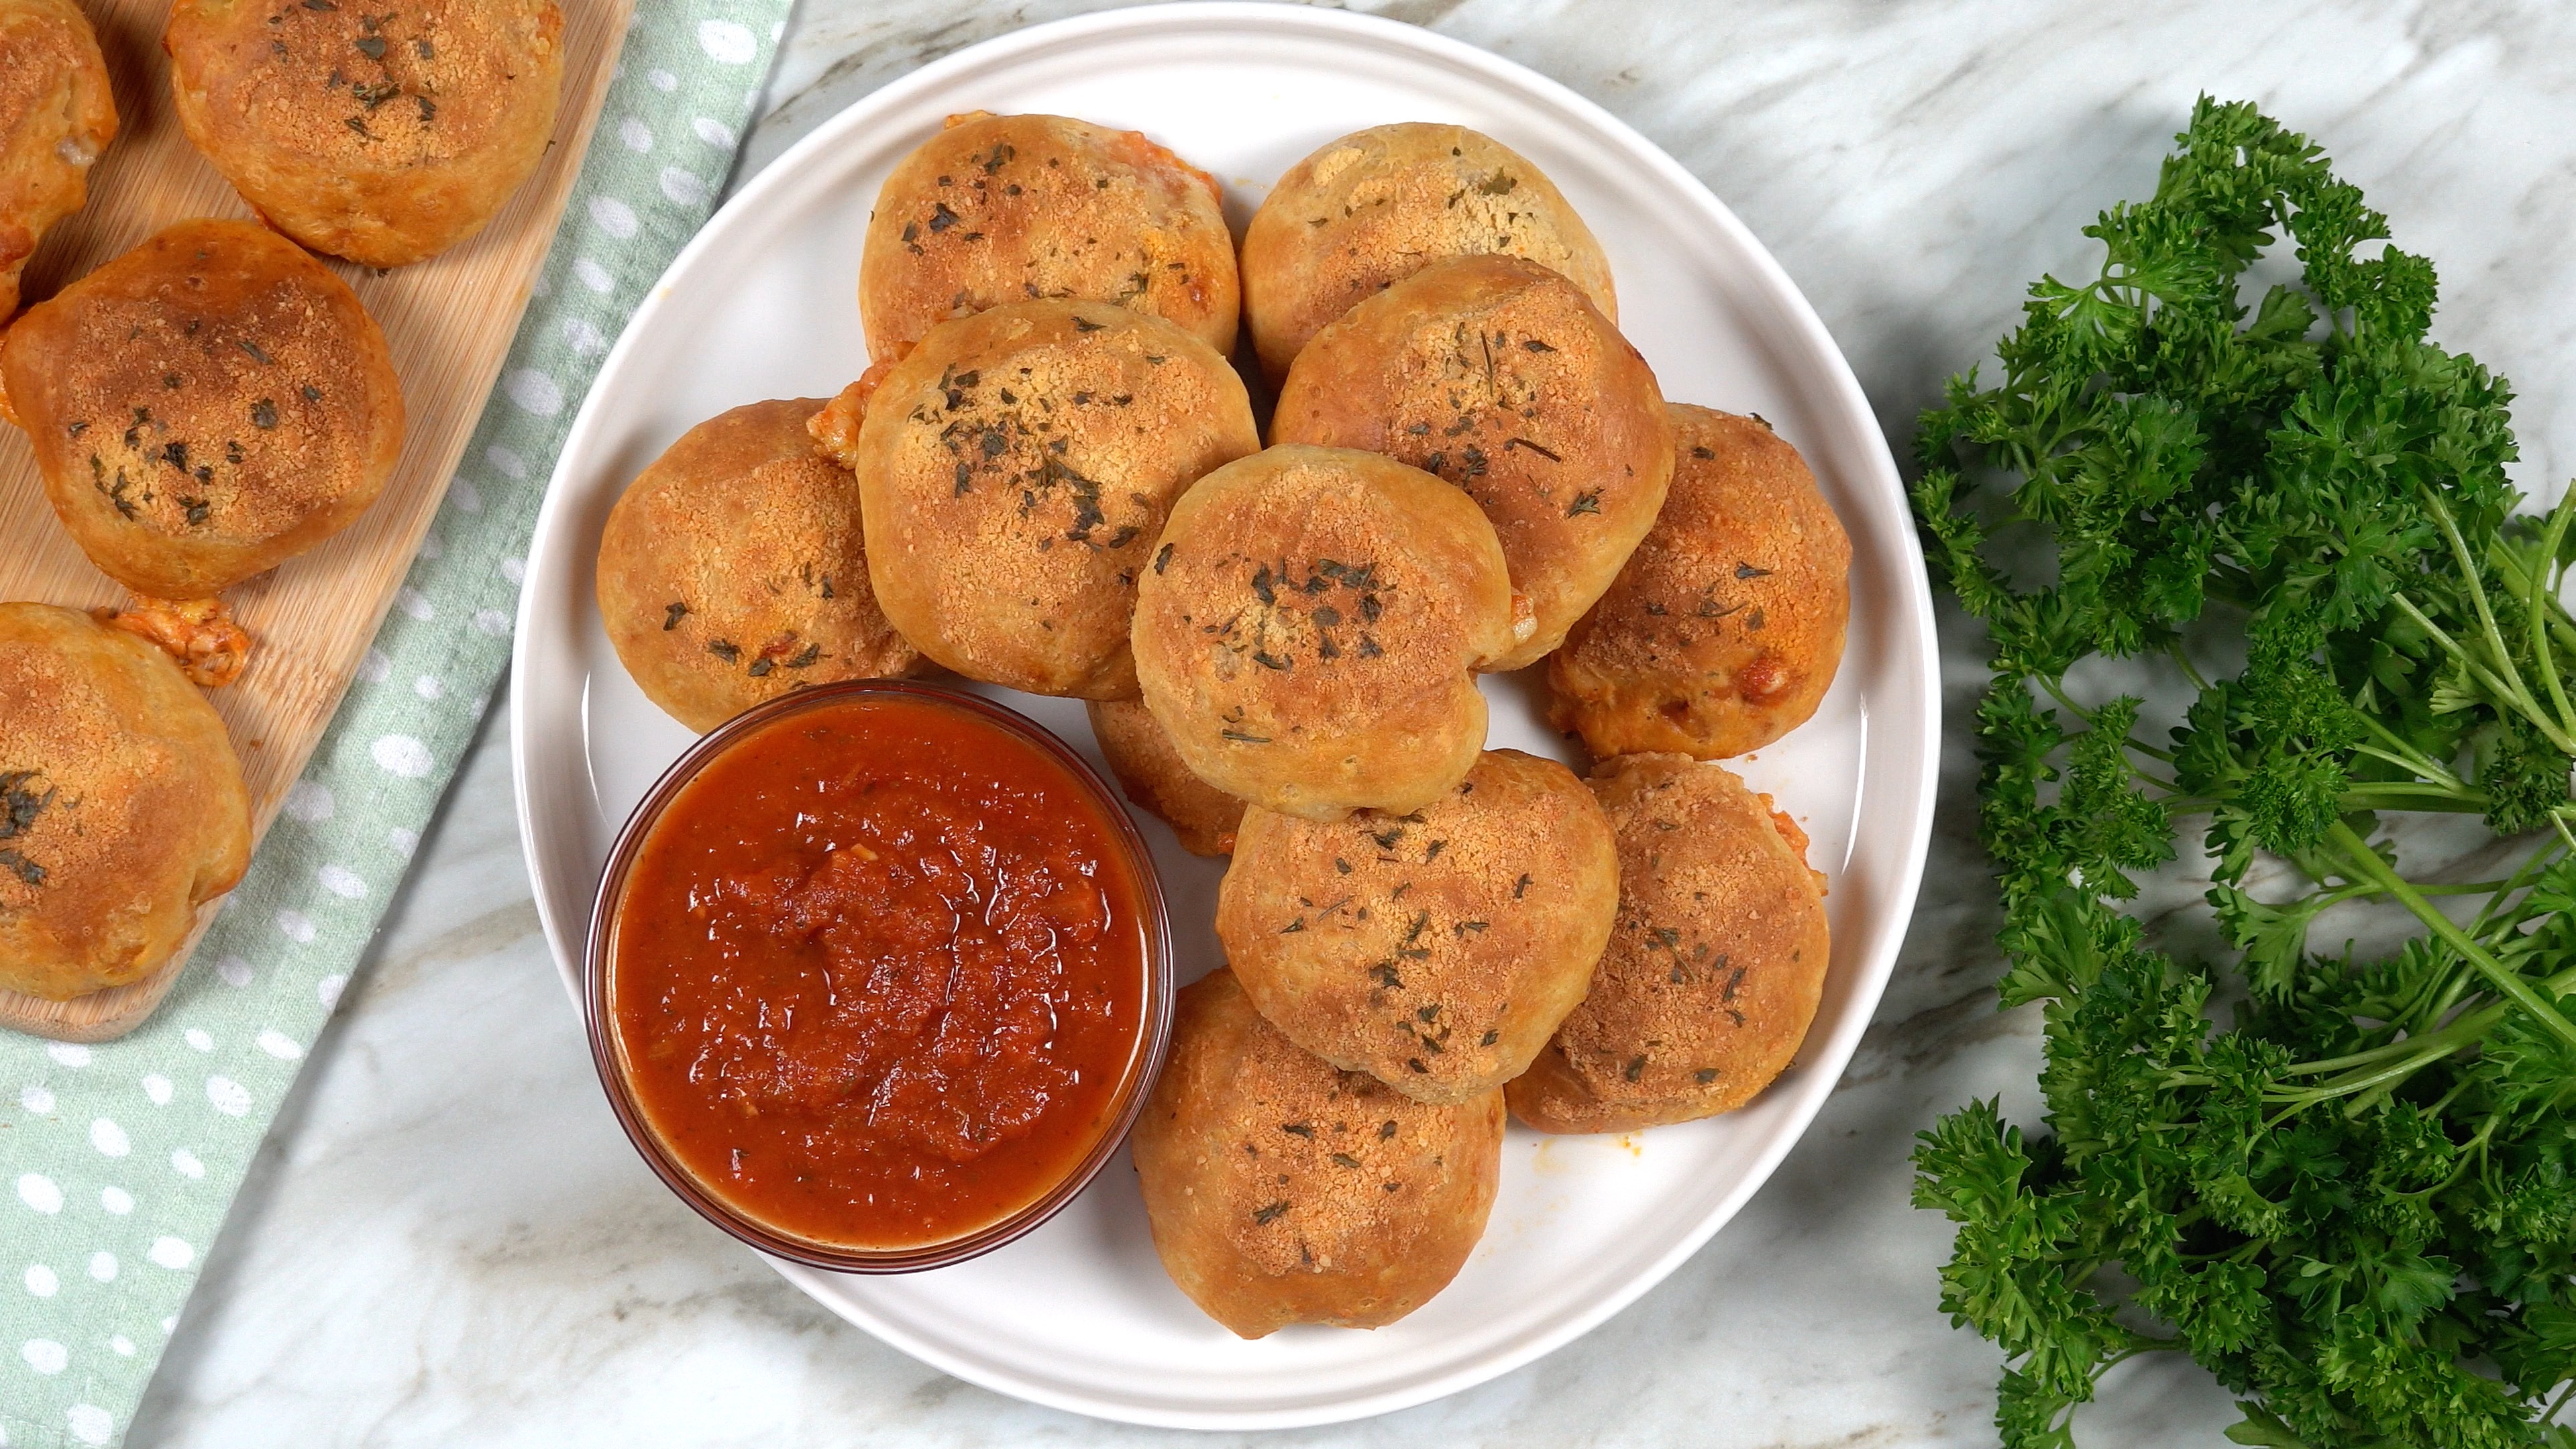
Easy Pizza Bombs
Delicious warm marinara, with melted mozzarella stuffed with pepperoni bombs that are filling and fun to eat. This recipe is better than any off the shelf product you may would consider for a party favor. Best served warm, this is an easy meal that is finger licking good. Beginner friendly, this type of meal is perfect on any occasion. Easy to make and very affordable this recipe is worth every bite. Warm bread full of scrumptious pizza flavors makes for a very fun and tasty snack or appetizer. We like them and believe you will too.
Watch the video and follow the instructions below to have tPizza Bombs with wings and beer ready to go today. Like and share this or any of my recipes you find interesting from my growing catalogue of menu selections. Don’t forget to hit the subscribe button to stay up to date on all the latest eatfoodlicious publications. This also keeps well in the refrigerator but is best served fresh in our opinion. Serve with extra marinara sauce to indulge in the pizza bliss of this hand held party pleaser. Thanks for visiting and see you again soon.
Please follow Facebook, Instagram, Twitter , Pinterest, or subscribe to my YouTube channel.

Split each biscuit in half.

Place biscuit on a lightly floured surface. Flatten each biscuit into a disc, about ⅛” (use thumb or rolling pin).

Add ½ tbsp pizza sauce (or marinara) to the center of the biscuit.

Add ½ tbsp cheese

Add 2 pepperoni slices. Pull each corned together and press until there is no gaps or holes.

Place seam side down on the baking sheet.

In a small bowl: combine melted butter, grated Parmesan cheese, garlic powder and mix. Brush garlic butter on top of the biscuit. Sprinkle dried parsley on top.

Bake for 15-18 minutes or until golden brown.

Serve with warm marinara sauce. Enjoy!
Recent Posts


Be sure to follow me on Facebook, Instagram, Twitter, Pinterest, YouTube or subscribe to the blog for emails and receive free EatFoodlicious recipes daily.
Share on social media

Pizza Bombs
Pizza filled bread that is a wonderful stackable delicious pepperoni marinara bomb.
Ingredients
- 1 can Pillsbury biscuits 16.3 oz
- ½ cup pizza sauce or marinara
- ½ cup shredded mozzarella cheese
- 32 slices Pepperoni
Garlic Butter
- ¼ cup melted butter
- 2 tbsp grated Parmesan cheese
- 1 tsp garlic powder
- dried parsley
Instructions
- Preheat the oven to 375°F. Place parchment paper on the baking sheet. Coat with butter or cooking spray.
- Split each biscuit in half. Place biscuit on a lightly floured surface. Flatten each biscuit into a disc, about ⅛" (use thumb or rolling pin).
- Add ½ tbsp pizza sauce (or marinara) to the center of the biscuit. Add ½ tbsp cheese & 2 pepperoni slices. Pull each corned together and press until there is no gaps or holes. Place seam side down on the baking sheet.
- In a small bowl: combine melted butter, grated Parmesan cheese, garlic powder and mix. Brush garlic butter on top of the biscuit. Sprinkle dried parsley on top. Bake for 15-18 minutes or until golden brown.
Serve with warm marinara sauce. Enjoy!
Video
Tried this recipe?Mention @eatfoodlicious or tag #eatfoodlicious!
Appetizer & Snacks


Baked Recipes


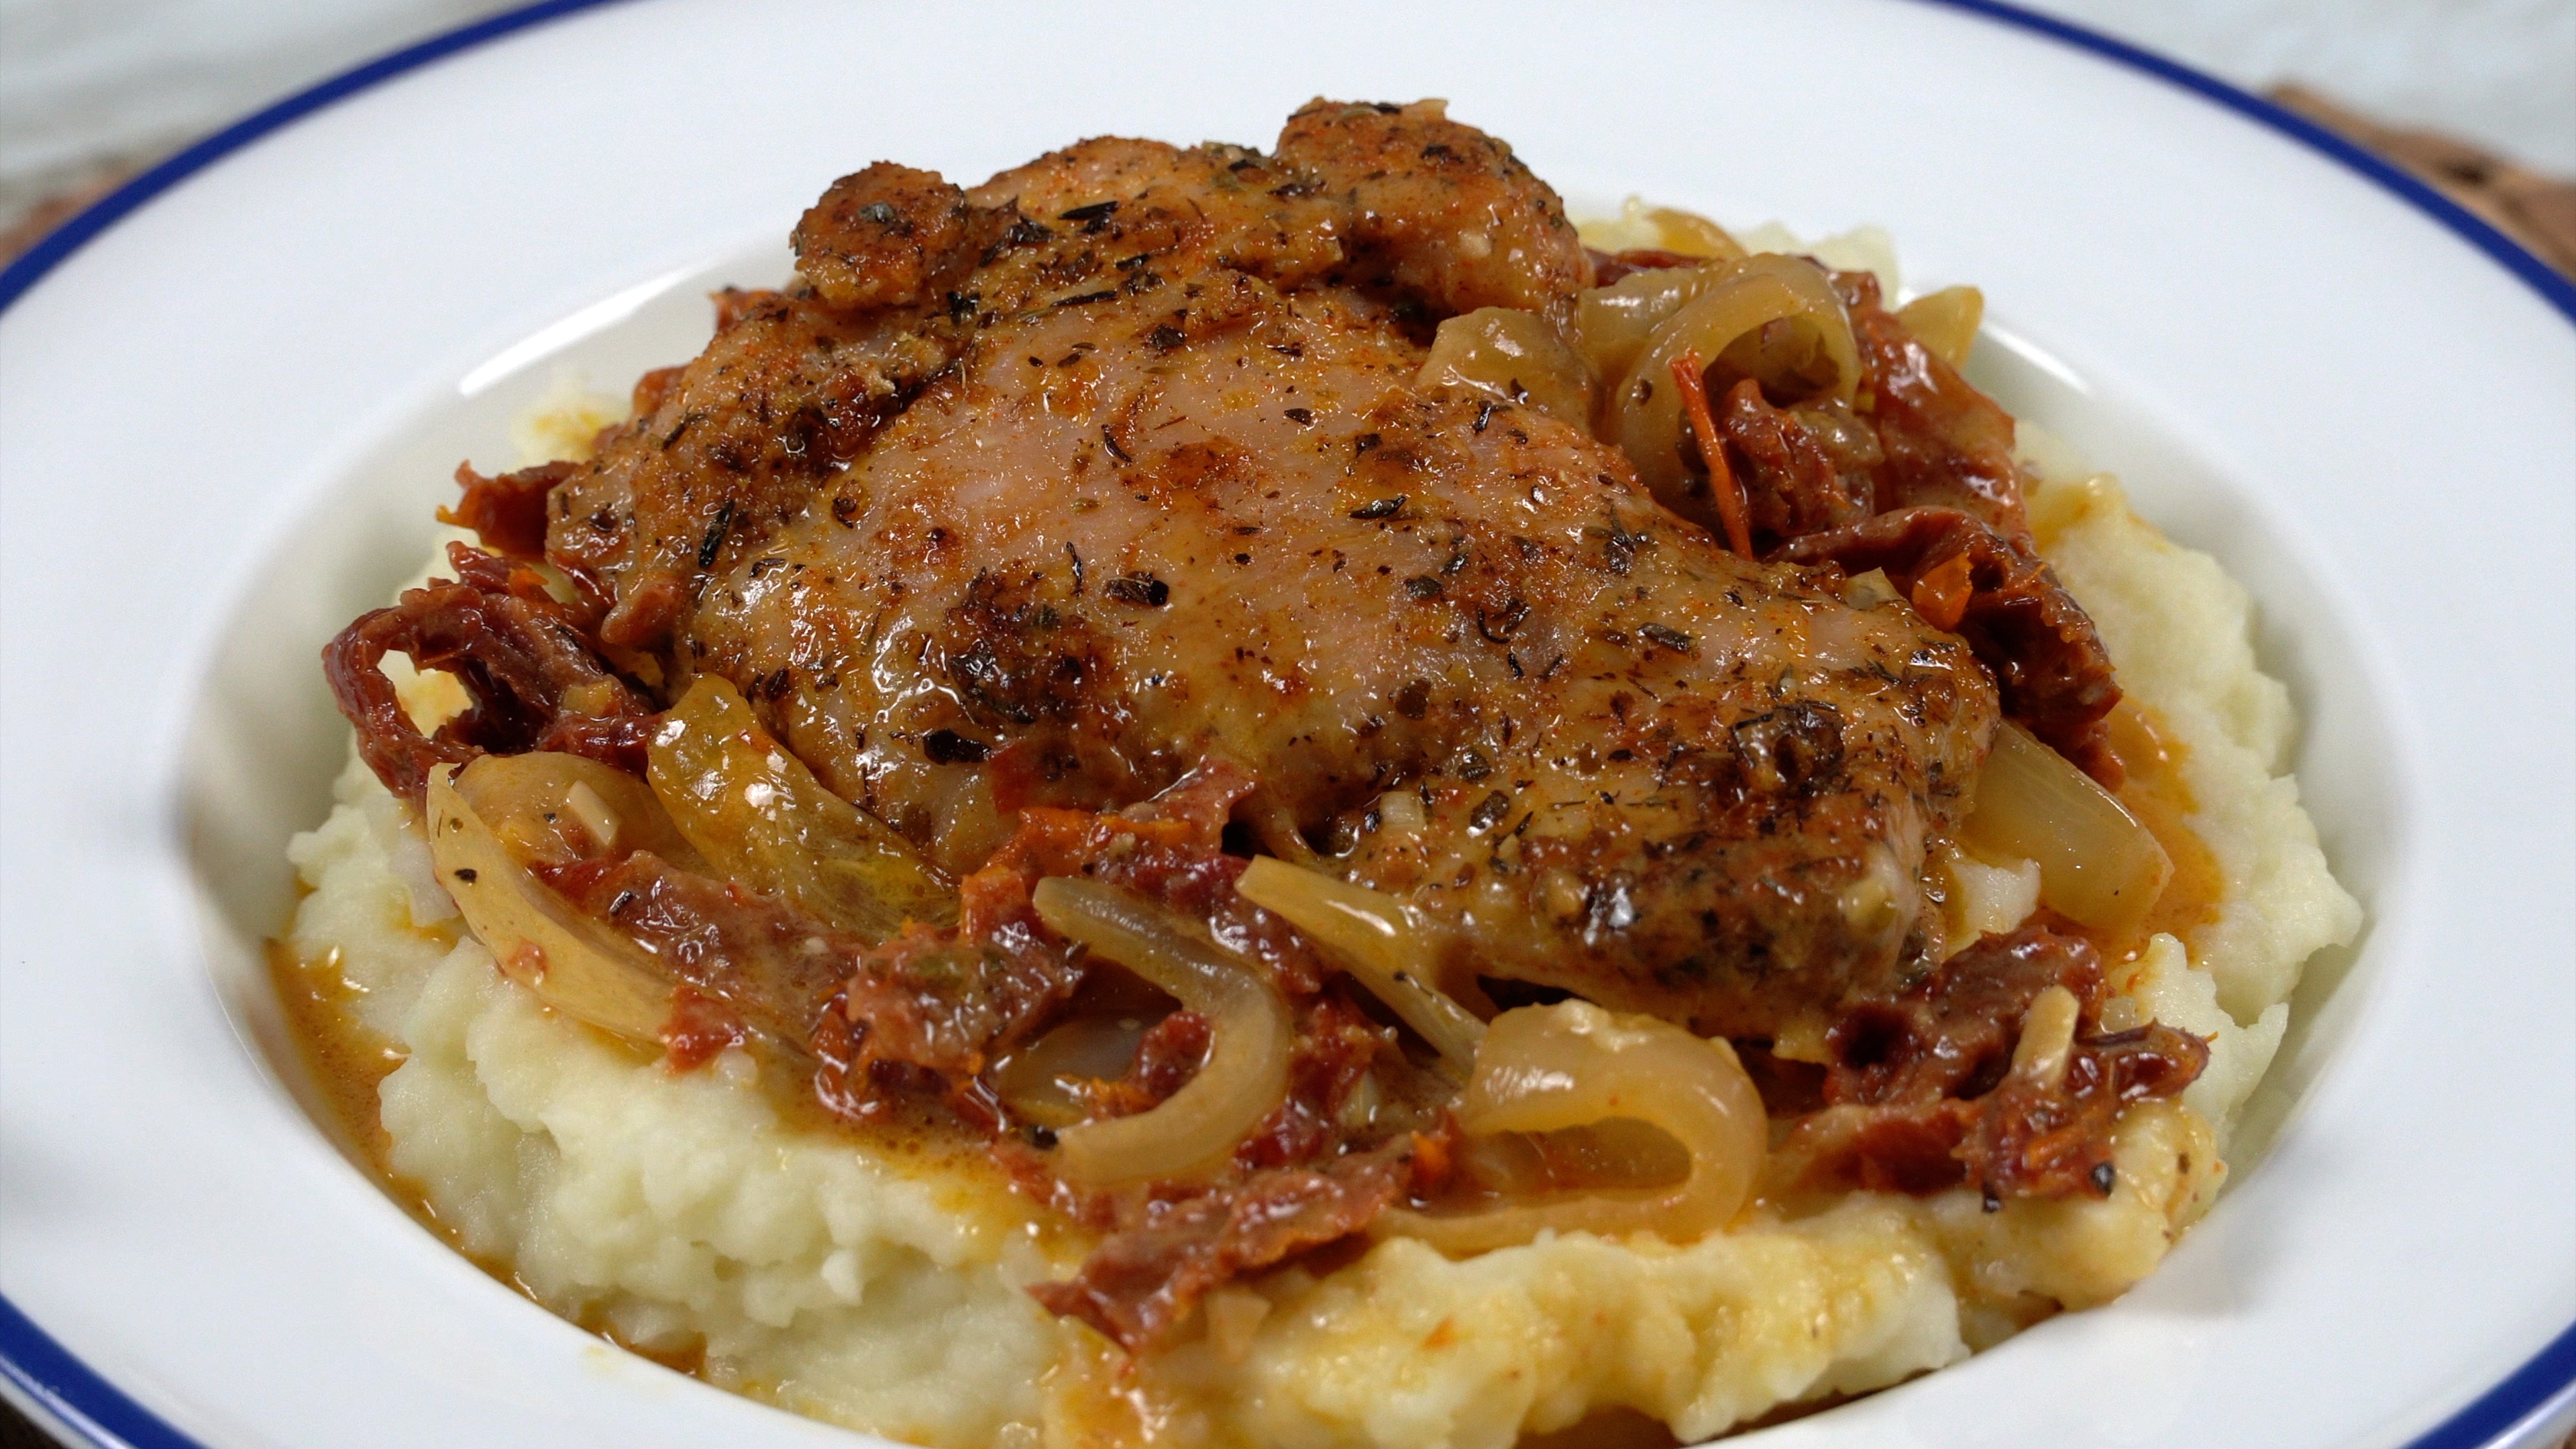
Sun Dried Tomato Chicken Thighs
Sun Dried Tomato Chicken Thighs are simmered to moist and tender excellence in a savory sauce that is perfect to serve with rice or mashed potatoes. Chicken Thighs are very affordable and this is one simple yet very tasty recipe. Full of flavor, textures and at a budget price, this is perfect normal meal planning. Simple and easy, anyone can make a meal that every will enjoy. My family enjoys this hearty selection and recommend you try it at least once to see for yourself how delicious it really is.
Watch the video and follow the instructions below to have this delicious Sun Dried Tomato Chicken Thigh entree today. Like and share this or any of my recipes you find interesting from my growing catalogue of menu selections. Don’t forget to hit the subscribe button to stay up to date on all the latest eatfoodlicious publications. Serve with fresh French bread as the sauce is with cleaning your plate for. Thanks for visiting and see you again soon.
Please follow Facebook, Instagram, Twitter , Pinterest, or subscribe to my YouTube channel.

Trim off fat from the chicken thighs.

Place the chicken in a bowl add garlic, onion, paprika, salt, black pepper, oregano, thyme, Parmesan cheese and mix everything together until well coated.

Marinate for 10 minutes.

Heat the pan up to medium-high and add sun dried tomato oil. Cooking in 2 batches: add half of the marinated chicken to the hot pan.

Sear 2-3 minutes per-side and then transfer to a plate/bowl. Repeat: sear and transfer to a plate/bowl the second batch of chicken.

In the same pan: add onions, sun dried tomatoes and sauté for 3-4 minutes or until the onions become translucent. Add garlic and cook for 30 seconds or until fragrant. Deglaze: pour in white wine to scrape the bottom of the pan. Let simmer for 2-3 minutes.

Add chicken broth, heavy whipping cream (evaporated milk or half & half for less calories) and mix everything together.

Return all the seared chicken to the pan.

Turn down the heat to medium. Simmer for 17-20 minutes until the chicken is fully cooked (internal temp. 165°F) and the sauce has thickened. Season with salt if needed.

Serve with vegetables, rice, salad, pasta or bread. Enjoy!
Recent Posts


Be sure to follow me on Facebook, Instagram, Twitter, Pinterest, YouTube or subscribe to the blog for emails and receive free EatFoodlicious recipes daily.
Share on social media

Sun Dried Tomato Chicken Thighs
Sun Dried Tomato Chicken Thighs are simmered to moist and tender excellence in a savory sauce that is perfect to serve with rice or mashed potatoes.
Ingredients
Marinate
- 6 chicken thighs (boneless & skinless) about 1.5 lbs
- 2 tbsp grated Parmesan cheese
- 1 tsp salt
- 1 tsp dried oregano
- ½ tsp black pepper
- ½ tsp garlic powder
- ½ tsp onion powder
- ½ tsp paprika
- ½ tsp dried thyme
Cook
- ½ cup sun dried tomatoes
- ½ cup dry white wine pinot grigio, sauvignon blanc, vermentino or chardonnay
- ½ cup chicken broth unsalted or low-sodium
- ½ cup heavy whipping cream
- 2 tbsp sun dried tomatoes oil from the jar
- 4 garlic cloves minced
- 1 small onion chopped
Instructions
- Trim off fat from the chicken thighs. Place the chicken in a bowl add garlic, onion, paprika, salt, black pepper, oregano, thyme, Parmesan cheese and mix everything together until well coated. Marinate for 10 minutes.
- Heat the pan up to medium-high and add sun dried tomato oil. Cooking in 2 batches: add half of the marinated chicken to the hot pan. Sear 2-3 minutes per-side and then transfer to a plate/bowl. Repeat: sear and transfer to a plate/bowl the second batch of chicken.
- In the same pan: add onions, sun dried tomatoes and sauté for 3-4 minutes or until the onions become translucent. Add garlic and cook for 30 seconds or until fragrant.
- Deglaze: pour in white wine to scrape the bottom of the pan. Let simmer for 2-3 minutes.
- Add chicken broth, heavy whipping cream (evaporated milk or half & half for less calories) and mix everything together. Return all the seared chicken to the pan.
- Turn down the heat to medium. Simmer for 17-20 minutes until the chicken is fully cooked (internal temp. 165°F) and the sauce has thickened. Season with salt if needed.
Serve with vegetables, rice, salad, pasta or bread. Enjoy!
Video
Tried this recipe?Mention @eatfoodlicious or tag #eatfoodlicious!
Chicken Recipes


Main Dishes


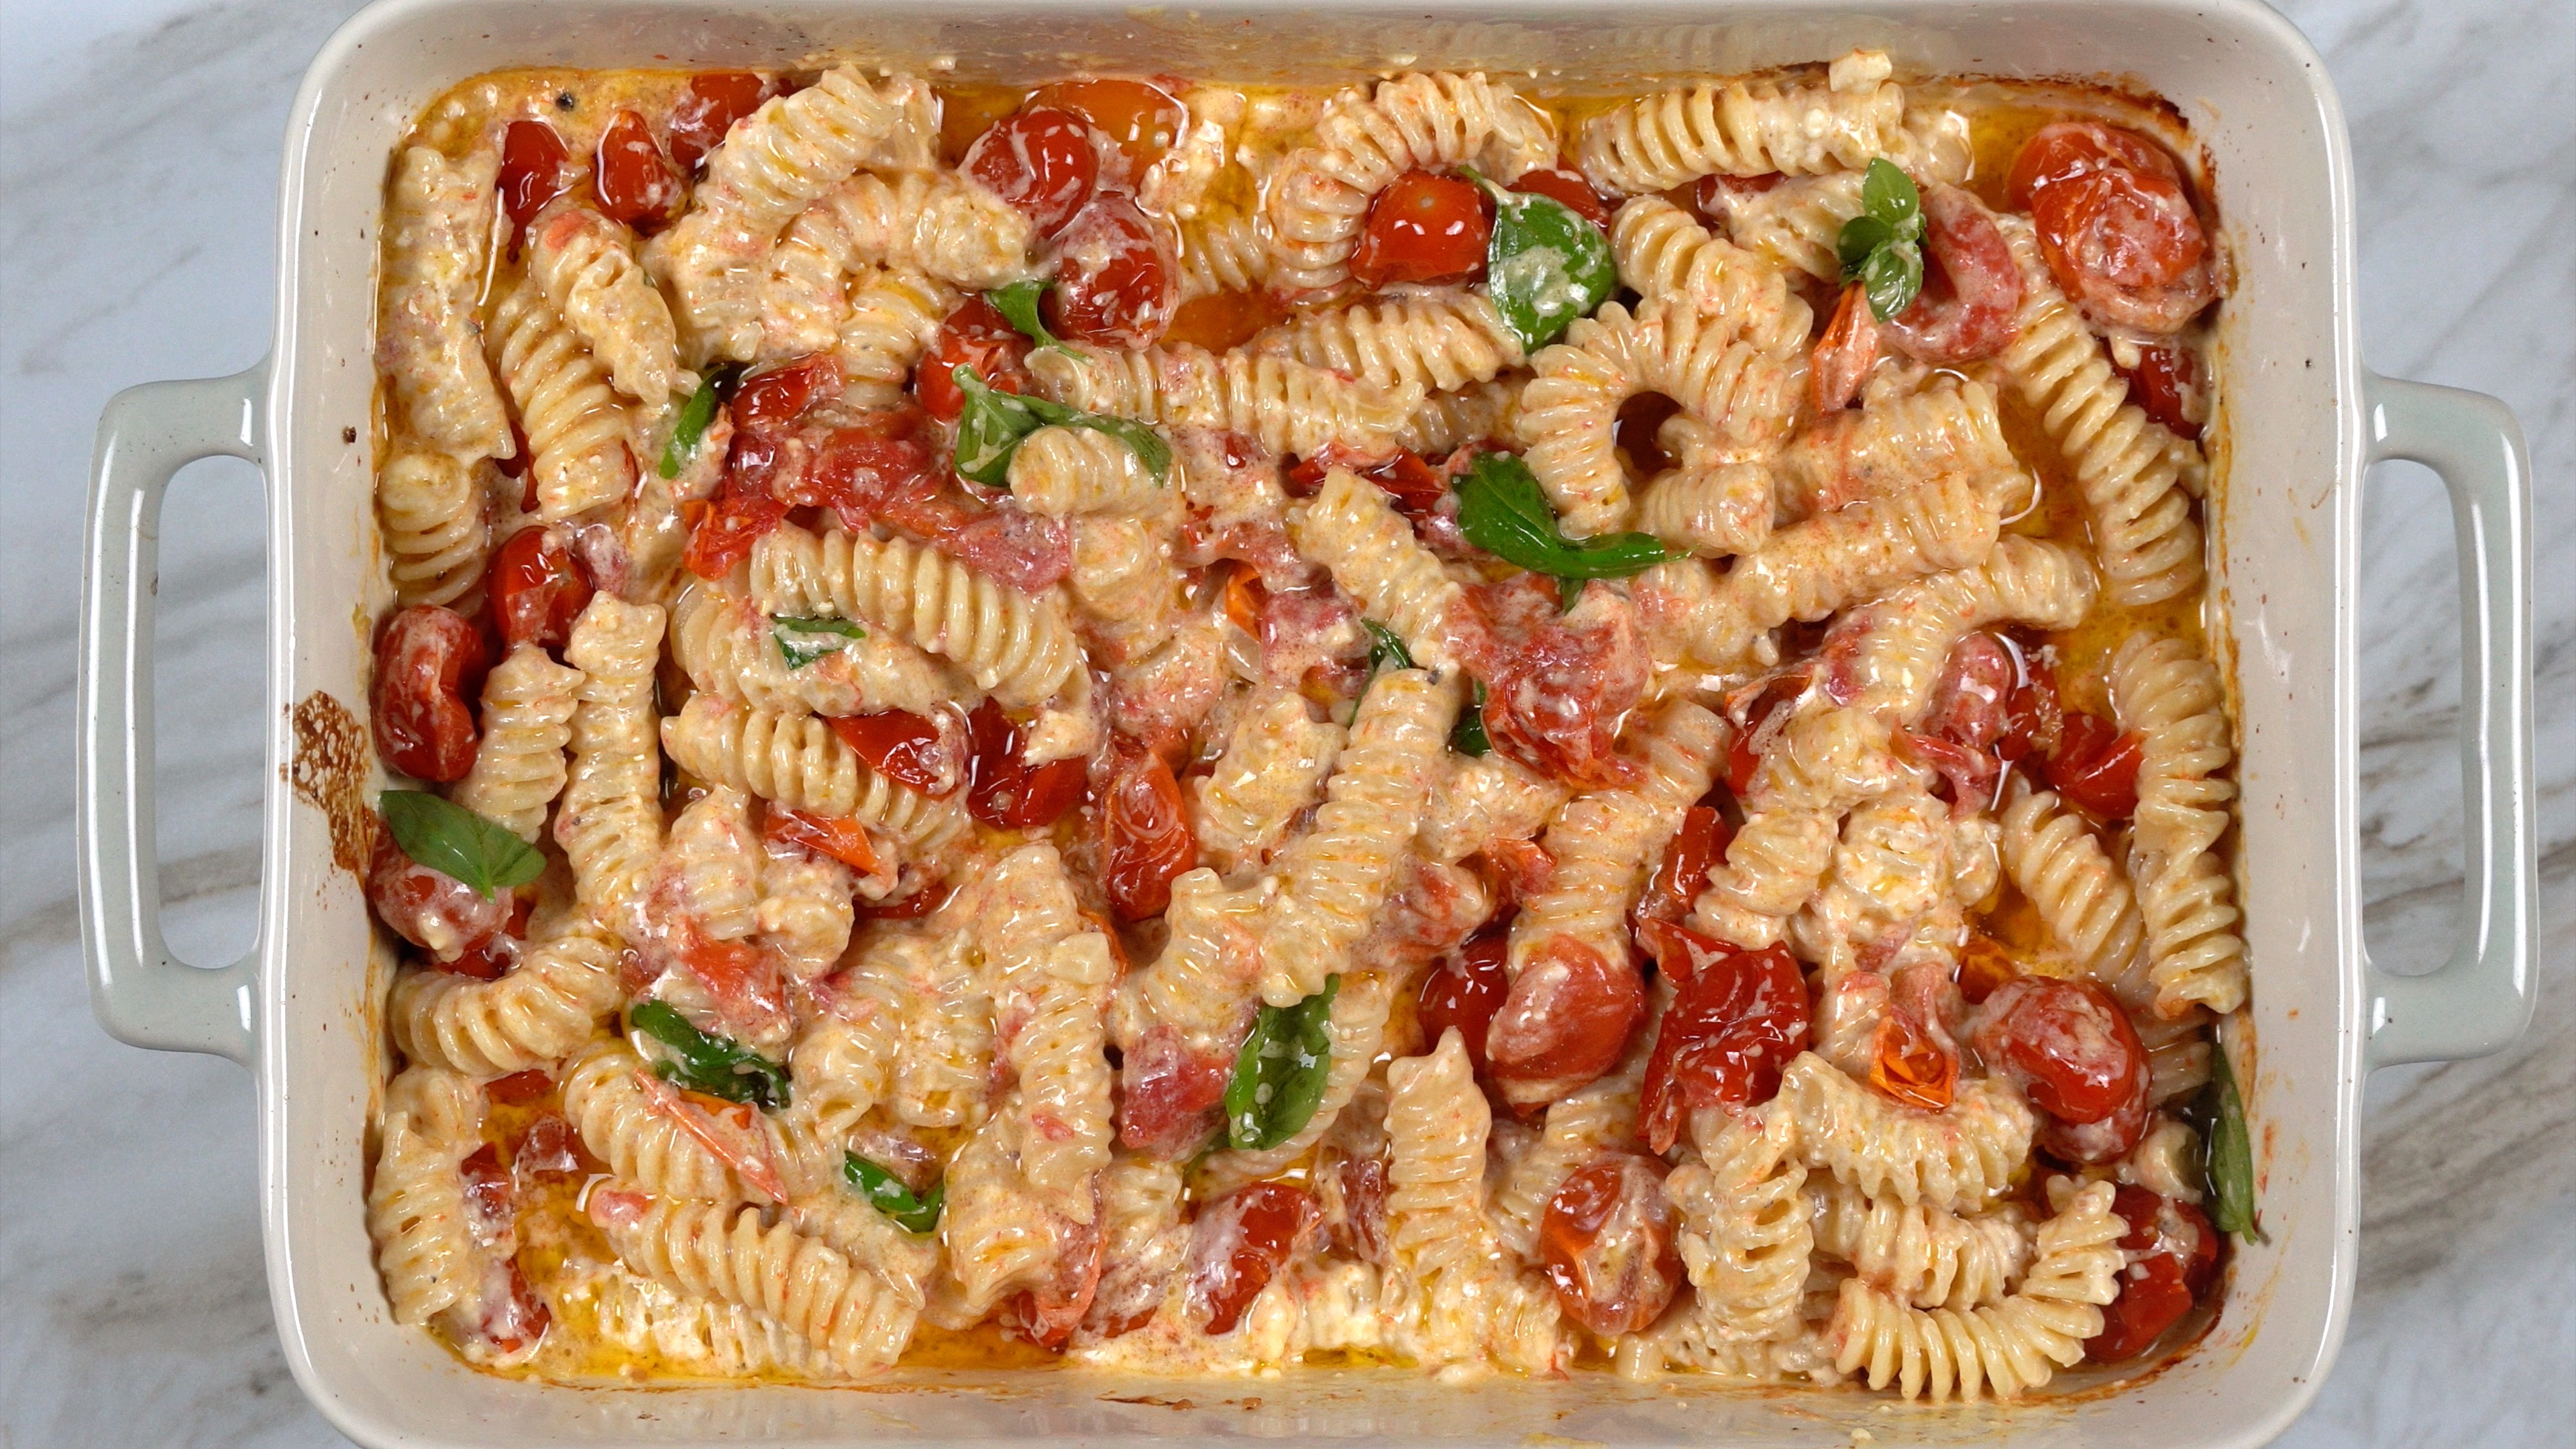
Feta Cheese & Tomato Pasta
Baked Feta Cheese & Tomato Pasta is creamy and delicious. The tomatoes add fresh essence and light acidity to balance out the smooth feta cheese. This recipe is beginner friendly and is perfect on any occasion. I enjoyed this recipe and recommend you try it at least once to see for yourself how delicious it really is.
Watch the video and follow the instructions below to have this easy to create sensation today. Like and share this or any of my recipes you find interesting from my growing catalogue of menu selections. Don’t forget to hit the subscribe button to stay up to date on all the latest eatfoodlicious publications. Warm tender pasta full of creamy cheese and fresh tomato juices is a naturally delicious combination. I hope you enjoy! Thanks for visiting and see you again soon.
Please follow Facebook, Instagram, Twitter , Pinterest, or subscribe to my YouTube channel.

Preheat the oven to 400°F. Add cheery tomatoes, olive oil, garlic to a baking dish (13″ x 9″). Season with salt on black pepper on top, then mix everything together.

Place the block of feta cheese in the center of the baking dish.

Drizzle more olive oil on top of the cheese.

Bake for 35 minutes. Meanwhile: cook pasta of your choice. Follow the instructions on the package for pasta cook time (al dente).

Remove baking dish from the oven. Use a wooden spoon or fork: mash and mix everything together.

Add cooked pasta noodles

Mix everything together.

Add fresh basil and mix.

Season with black pepper & red pepper flakes to taste. Serve with garlic bread! Enjoy!
Recent Posts


Be sure to follow me on Facebook, Instagram, Twitter, Pinterest, YouTube or subscribe to the blog for emails and receive free EatFoodlicious recipes daily.
Share on social media

Baked Feta Cheese and Tomato Pasta
Baked Feta Cheese & Tomato Pasta is simple and delicious.
Ingredients
- 8 oz block feta cheese
- 2 pints cherry tomatoes about 4 cups
- ½ cup extra light virgin olive oil
- ⅓ cup fresh basil leaves
- 3 garlic cloves minced
- salt & pepper to taste
- 8 oz pasta
Instructions
- Preheat the oven to 400°F.
- Add cherry tomatoes, olive oil, garlic to a baking dish (13" x 9"). Season with salt on black pepper on top, then mix everything together. Place the block of feta cheese in the center of the baking dish. Drizzle more olive oil on top of the cheese. Bake for 35 minutes.
- Meanwhile: cook pasta of your choice. Follow the instructions on the package for pasta cook time (al dente).
- Remove baking dish from the oven. Use a wooden spoon or fork: mash and mix everything together.
- Add cooked pasta noodles and mix everything together. Add fresh basil and mix. Season with black pepper & red pepper flakes to taste.
Serve with garlic bread! Enjoy!
Video
Tried this recipe?Mention @eatfoodlicious or tag #eatfoodlicious!
Italian Recipes
Pasta Recipes
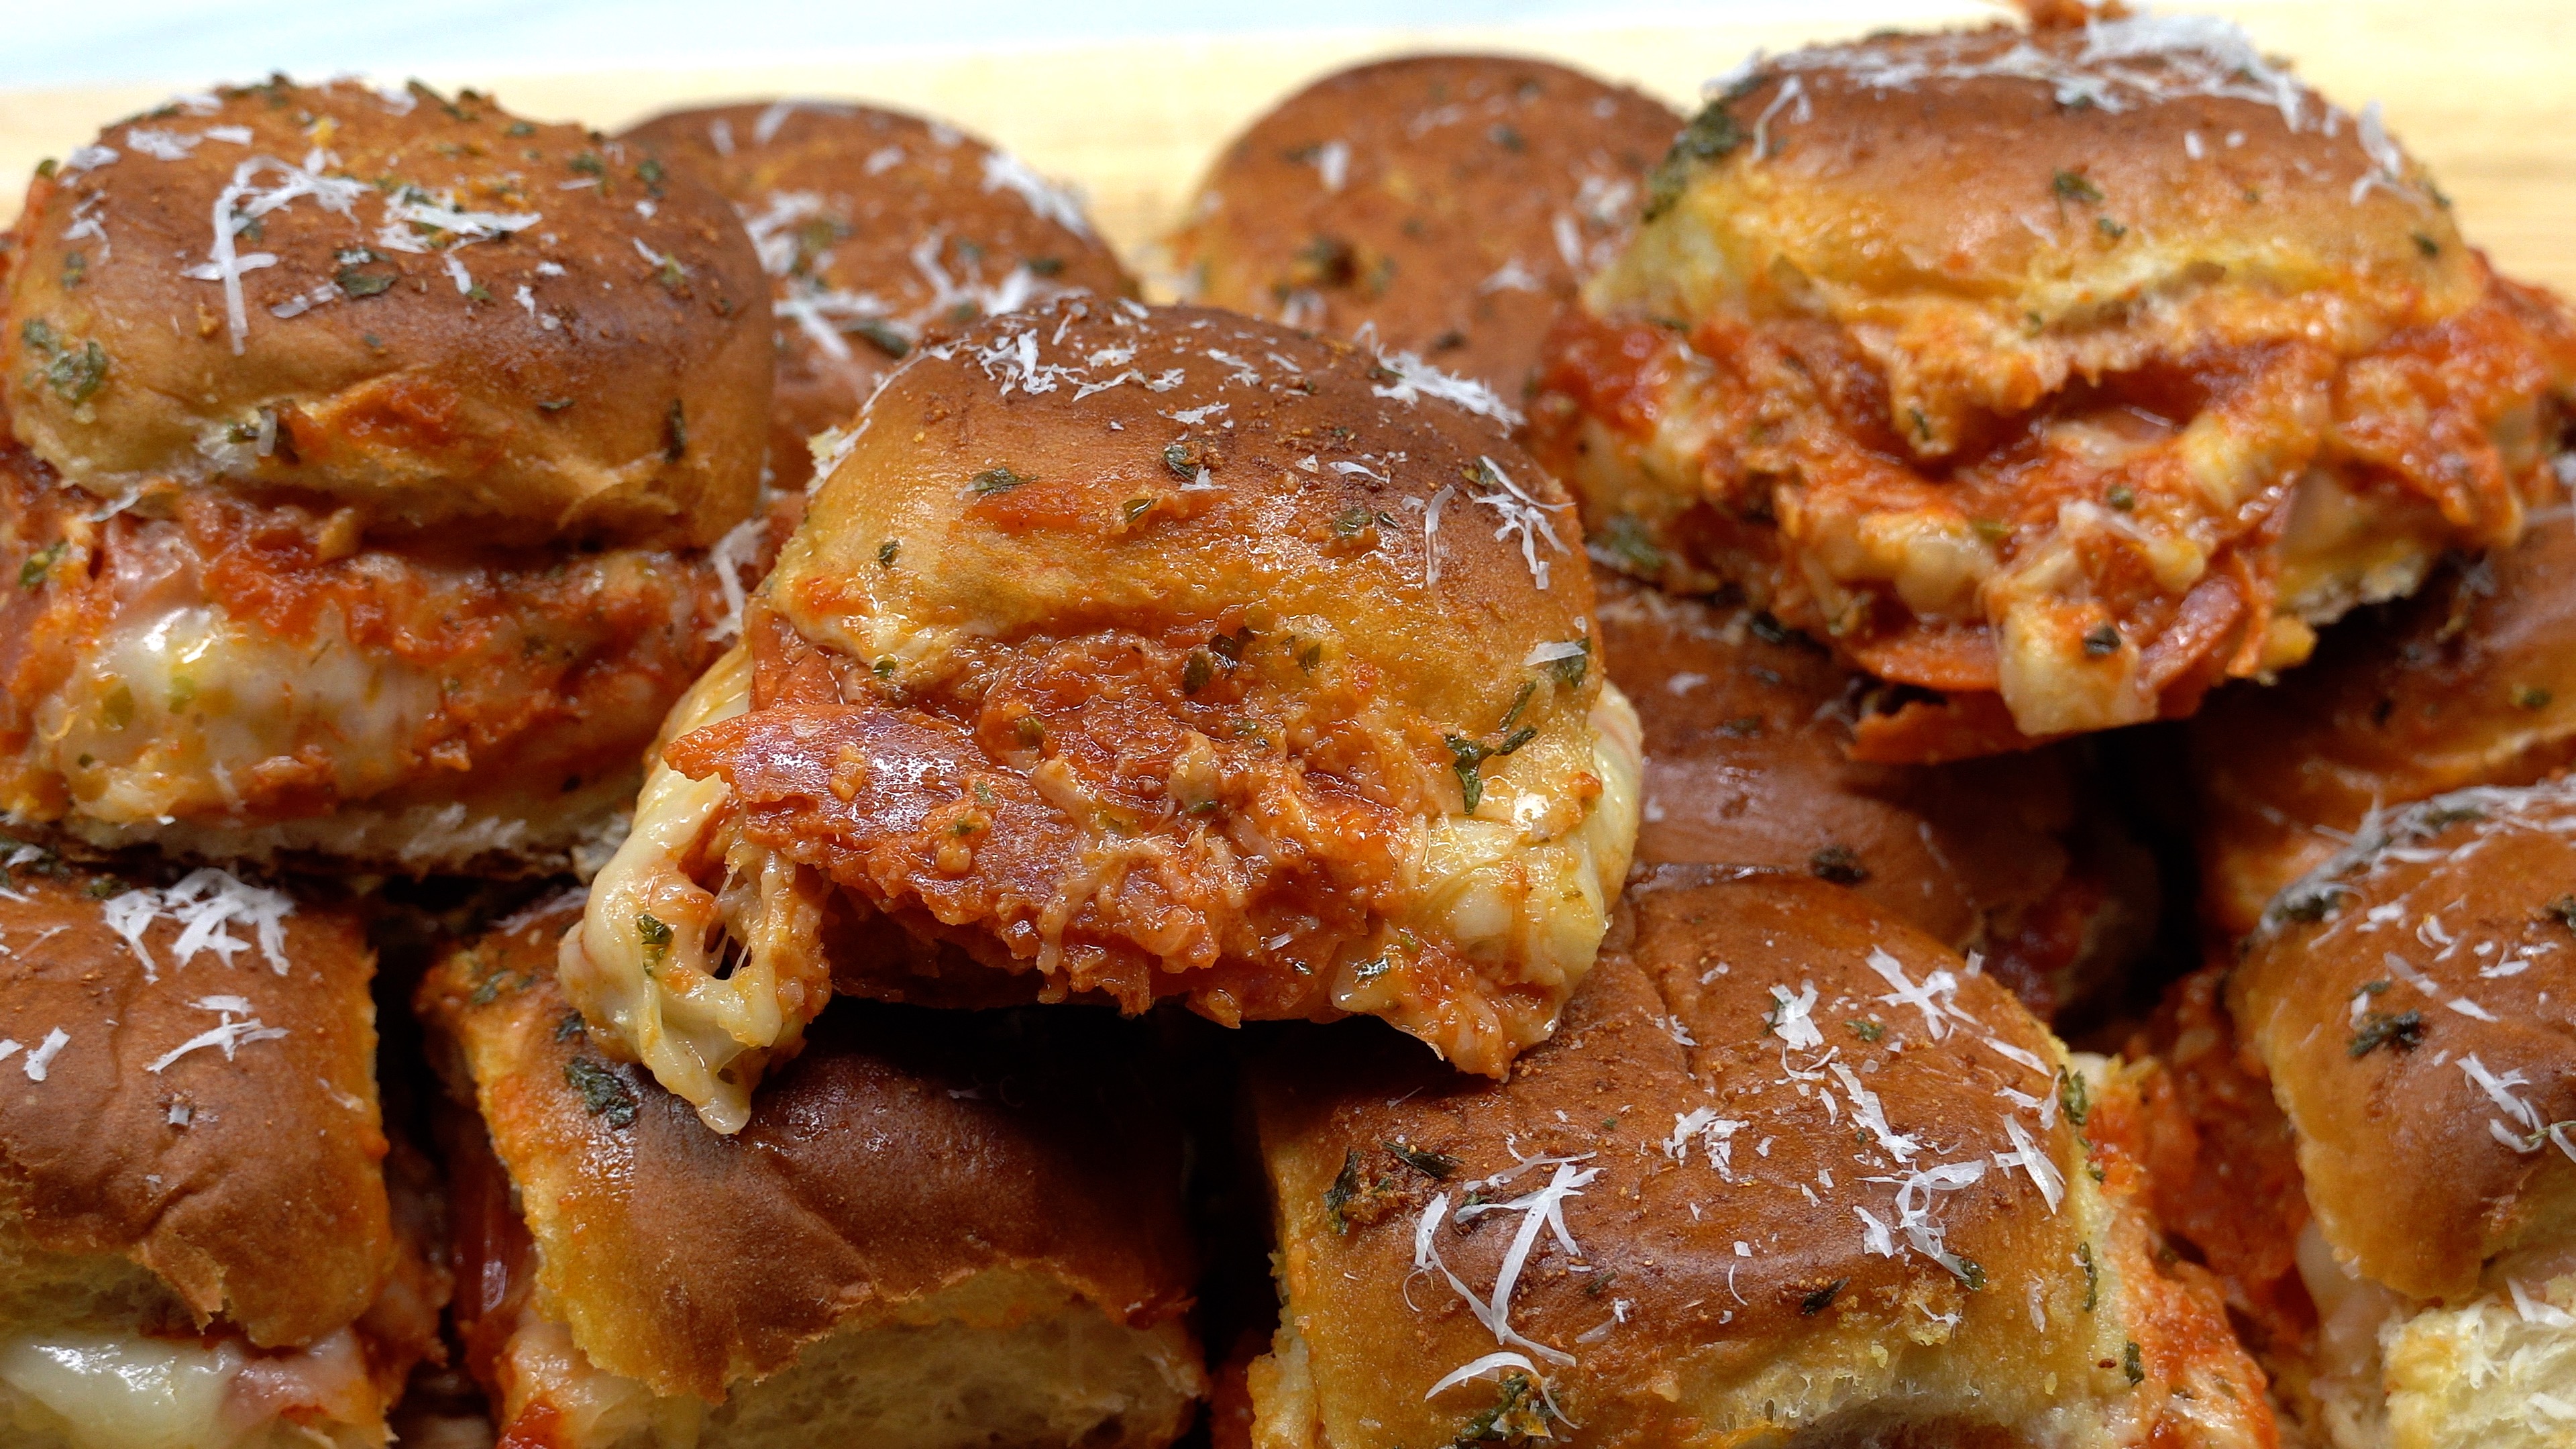
Pepperoni Pizza Sliders
Pepperoni Pizza Sliders are perfect snack or appetizers because they are cheesy little delights everyone will enjoy. Simple and easy this slice, stack and go recipe is perfect on any occasion. Full of pepperoni and marinara flavors, cheesy textures and toasted sweet sliders at a budget price, this is perfect normal meal planning. This is a beginner friendly recipe that I recommend you try it at least once to see for yourself how delicious it really is.
Watch the video and follow the instructions below to have one of these buttery rich and delicious pizza flavored delights today. Like and share this or any of my recipes you find interesting from my growing catalogue of menu selections. Don’t forget to hit the subscribe button to stay up to date on all the latest eatfoodlicious publications. Enjoy these with you favorite cold beverage while they are nice and hot and turn simple ingredients into an eatfoodlicious experience. Thanks for visiting and see you again soon.
Please follow Facebook, Instagram, Twitter , Pinterest, or subscribe to my YouTube channel.

In a bowl: whisk melted butter, garlic, parsley until well mixed.

Spread ½ cup of the pizza sauce over the bottom halves of the sliders.

Sprinkle ¾ cup mozzarella cheese next.

Then layer with pepperoni.

Sprinkle the rest of the mozzarella for the next layer. Then add grated Parmesan cheese to your liking. Finally drizzle the rest of the pizza sauce over the cheese layers. Sprinkle oregano on top.

Then, top with the upper halves of the sliders. Then brush or spread the butter mixture over the top of the rolls.

Bake for 15-20 minutes or until the cheese has melted.

Serve immediately and enjoy!
Recent Posts


Be sure to follow me on Facebook, Instagram, Twitter, Pinterest, YouTube or subscribe to the blog for emails and receive free EatFoodlicious recipes daily.
Share on social media

Pepperoni Pizza Sliders
Cheesy and delicious Pepperoni Pizza Sliders that everyone will enjoy.
Ingredients
- 12 Hawaiian rolls
- 1 ½ cups shredded mozzarella cheese divided
- 1 cup pizza or marinara sauce divided
- ½ cup grated Parmesan cheese
- 6 oz pepperoni slices
- ½ tsp dried oregano
Butter Topping
- 2 tbsp melted butter
- 1 tsp dried parsley
- ½ tsp garlic powder
Instructions
- Preheat the oven to 350°F.
- Don’t pull the rolls apart. Cut them in half horizontally. Place the top halves aside and bottom halves in the baking pan (coat the bottom of the pan with cooking spray).
- Spread ½ cup of the pizza sauce over the bottom halves of the sliders. Sprinkle ¾ cup mozzarella cheese next. Then layer with pepperoni. Sprinkle the rest of the mozzarella for the next layer. Then add grated Parmesan cheese and oregano. Finally drizzle the rest of the pizza sauce over the cheese layers. Then, top with the upper halves of the sliders.
- In a bowl: whisk melted butter, garlic, parsley until well mixed. Then brush or spread the butter mixture over the top of the rolls
- Bake for 15-20 minutes or until the cheese has melted.
Serve immediately and enjoy!
Video
Tried this recipe?Mention @eatfoodlicious or tag #eatfoodlicious!
Appetizer & Snack Recipes


Italian Recipes