


Most Recent Posts

Sweet and savory Dutch Oven Braised Brisket in cherry tomatoes and onions is a simple meal that can be served with anything you prefer. It’s definitely great option for people on a low carb diet. Full of flavor, textures and at a budget price, this is perfect normal meal planning. This meal keeps great in the refrigerator and heats up with little effort to have a ready to go meal almost anytime of the week.
People who are not on a low carb diet they can serve it with rice or on a bed of fresh mashed potatoes for a complete and balanced meal. Baked beans, coleslaw, corn on the cob, macaroni & cheese, Texas toast or French bread also make good partners for this hearty meal. The Dutch Oven is perfect for this traditionally tough cut of beef; it helps to hold the moisture in the pot allowing the brisket to develop the perfect level of natural juices and succulent tenderness.
Watch the video and follow the instructions below to have this succulent meal ready to go today. Like and share this or any of my recipes you find interesting from my growing catalogue of menu selections. Don’t forget to hit the subscribe button to stay up to date on all the latest eatfoodlicious publications. Brisket can be very tough if not allowed to cook properly. Follow the directions for guaranteed tender and delicious results. Thanks for visiting and see you again soon.
Please follow Facebook, Instagram, Twitter , Pinterest, or subscribe to my YouTube channel.

Clean and pat the brisket dry with a paper towel. Optional: trim and discard some of the fat. Rub salt & pepper on the meat side of the brisket (not the fat side). Set aside.

Preheat the oven to 350°F. Add sliced onions, cherry tomatoes, garlic, tomato paste, broth, olive oil, Worcestershire sauce, carrots and bay leaves in the Dutch Oven.

Place brisket on top (fat side up). Cover with lid.

Place dutch oven in the lower rack of the oven. Cook for 3-4 hours or until the meat is fork tender. Check the brisket after 3 hours and add more liquid (broth/water) if needed.

Remove brisket from the dutch oven. Let rest for 30 minutes. Slice the meat against the grain.

Serve & enjoy!
Recent Posts
Be sure to follow me on Facebook, Instagram, Twitter, Pinterest, YouTube or subscribe to the blog for emails and receive free EatFoodlicious recipes daily.
Share on social media

Dutch Oven Recipes
Beef Recipes

A hearty homemade Mushroom Beef Stew. Braised beef and onion are some of my favorite ways to unleash natural appeal to the cooking process. The kitchen starts to warm up from the cooking and the tantalizing aromas promised. Chuck is the preferred choice of meat as it does not get stringy. This recipe is perfect for prepping the “preliminaries” ahead of time and then combining the final fixings just prior to serving. This approach to creating a hearty meal covers some of the most succulent methods for flavor profiles and texture development.
I work to compress recipes into a short video with easy to follow recipes. However, I would like to acknowledge the giant that came before us that is the inspiration of this recipe. Try this dish and taste the elegance of this simple hearty stew.
Watch the video and follow the instructions below to flex your culinary acumen. Like and share this or any of my recipes you find interesting from my growing catalogue of menu selections. Don’t forget to hit the subscribe button to stay up to date on all the latest eatfoodlicious publications. And remember the key to a well braised meat is drying the the chuck to remove all water, otherwise you are just steaming and not growing. Thanks for visiting and see you again soon.
Please follow Facebook, Instagram, Twitter , Pinterest, or subscribe to my YouTube channel.

Pat the beef dry, cut into 1″ cubes and place in a large bowl. Coat with salt, pepper and mix.

Heat the dutch oven or pot to medium-high. Add 2 tbsp oil and wait until hot.

Place a third of the beef in the dutch oven/pot and sear all sides for 3-5 minutes or until brown (do not over crowd the meat). Remove the beef and set aside. Repeat this step with the rest of the beef & remove.

In the same dutch oven/pot: add ¼ cup butter and wait for 30 seconds. Add onions & sauté for 3 minutes.

Add sliced mushrooms and sauté for 7-8 minutes or until slightly brown and wilted. Add garlic and sauté for 30 seconds.

Add tomato paste, Worcestershire sauce and mix everything together. Sauté for 2-3 minutes. Sprinkle flour and mix everything together. Pour red wine and deglaze the bottom of the pot.

Turn up the heat to high and bring to a simmer. Return seared beef to the pot. Add chopped & beef broth. Stir everything together.

Add herb bouquet: thyme, bay leaves & rosemary (make sure to submerged in the broth). Cover the pot with a lid.

Place the dutch oven/pot in the middle rack of the oven. Cook for 5 minutes at 400°F (make sure to have the timer on). Then, turn down the oven to 325°F. Cook for 2 ½ – 3 hours or until the meat is fork tender. Remove pot from oven. Discard herb bouquet.

Add 4 tbsp cold butter (not softened). This is called Monter au Beurre in French, sauce with butter.

Gently stir everything together until the butter is fully melted. Season with salt & pepper to taste if needed.

Serve & enjoy!
Recent Posts
Be sure to follow me on Facebook, Instagram, Twitter, Pinterest, YouTube or subscribe to the blog for emails and receive free EatFoodlicious recipes daily.
Share on social media

Stew Recipes
Beef Recipes
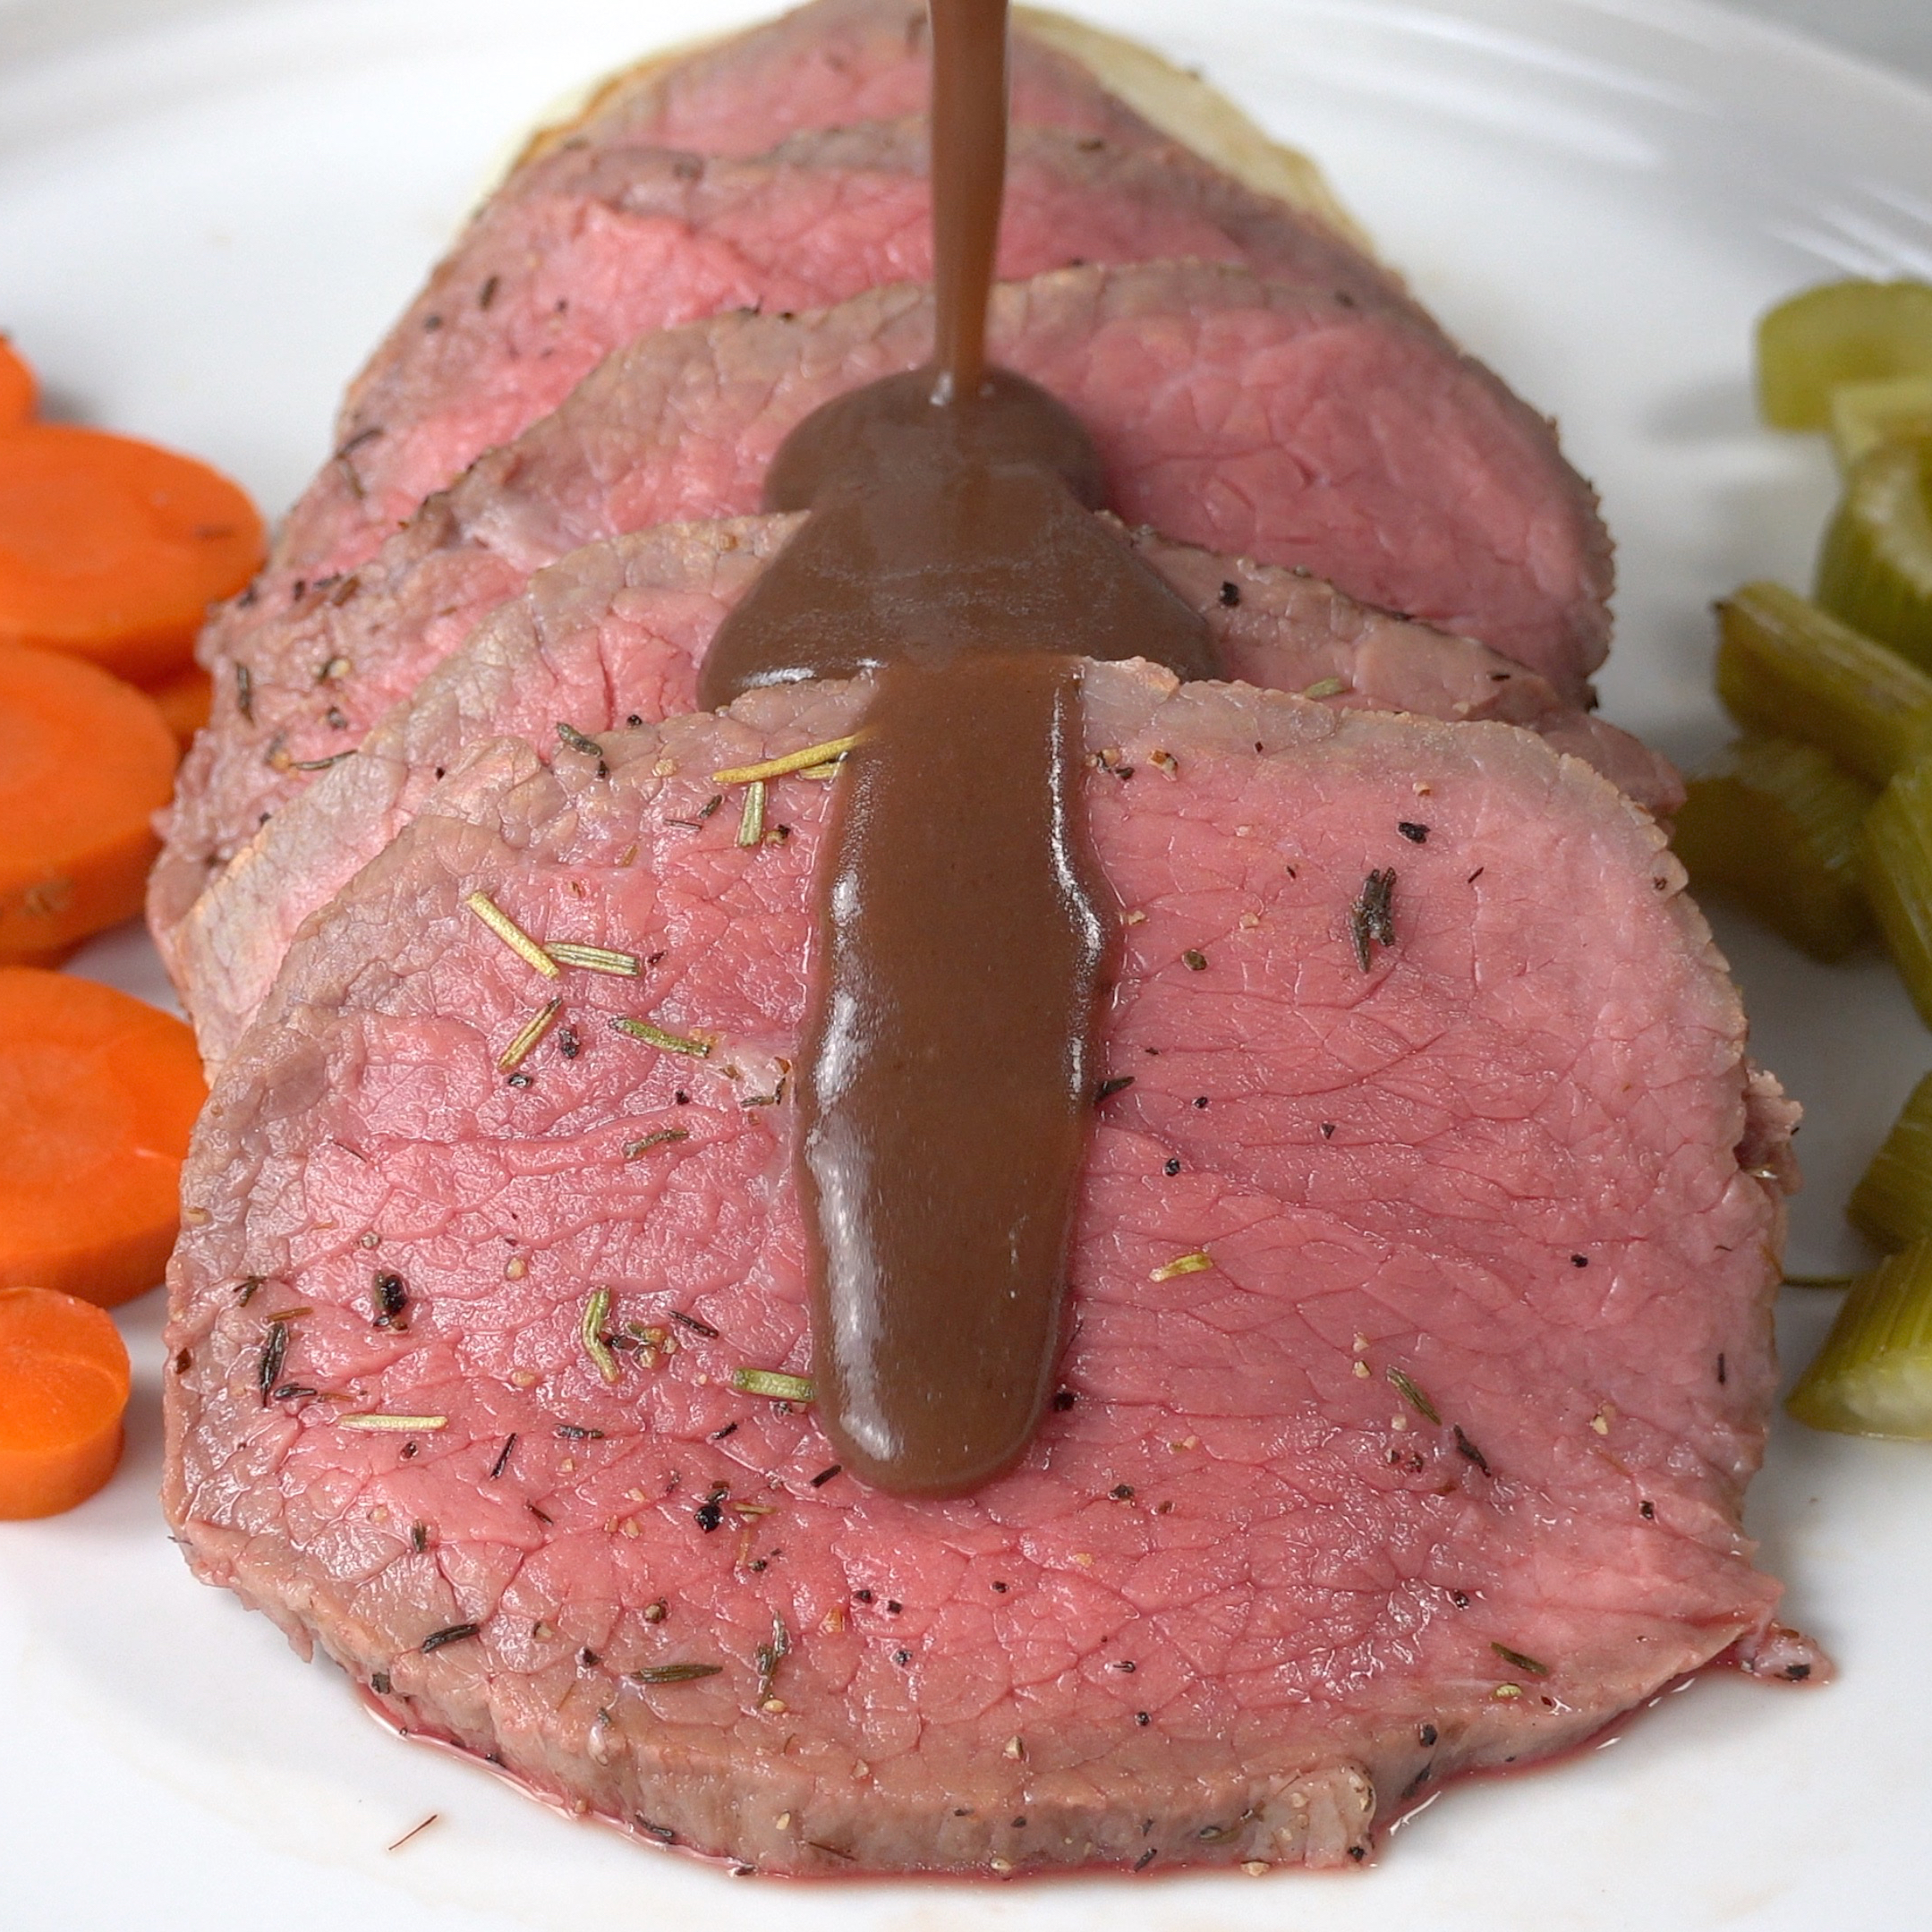
Tender and juicy Eye of Round Roast with succulent gravy make a beautiful entree that is perfect for seasonal celebrations or any time you desire a deliciously fancy meal. The eye of round is an affordable holiday dish that gets most of the benefits of a fancy rib roast at a fraction of the cost. This dish is a very juicy and tender cut when following a good recipe like this one. Full of flavor, textures and at a budget price, this is perfect normal meal planning but is also ideal for your holiday celebration. The aromas of a well seasoned cut will drive everyone in the house to the table ready to eat at neck break speed. I enjoyed this recipe and recommend you try it at least once to see for yourself how delicious it really is.
Watch the video and follow the instructions below to have this tender and juicy today. Like and share this or any of my recipes you find interesting from my growing catalogue of menu selections. Don’t forget to hit the subscribe button to stay up to date on all the latest eatfoodlicious publications. Prefect with vegetables this dish is on you can be proud of and happy to share with friends and family alike. Thanks for visiting and see you again soon.
Please follow Facebook, Instagram, Twitter , Pinterest, or subscribe to my YouTube channel.

In a small bowl: combine salt, black pepper, thyme, rosemary and mix.

Pat the roast dry with a paper towel.

Pour and rub olive oil all over the roast. Then coat the roast with the seasoning mixture.

Place sliced onions, carrots, celery & garlic in the 9″ x 13″ baking dish.

Place the roast on a vegetables.

Place the baking dish in the middle rack of the oven. Cook for 5 minutes at 475°F (make sure to have the timer on). Then, turn down the oven to 250°F. Cook for 13 min per-lb (it took me 45 minutes). Medium-rare (internal temp.130°-135°F) (highly recommended) , medium (internal temp. 140°-145°F). Open the door and confirm the anticipated Internal temperature using a meat thermometer. Remove the roast from the pan and transfer to a plate. Tent with foil.

Transfer the drippings or butter to a sauce pan. Turn up the heat to med-high. Wait until the grease gets really hot. Add flour and whisk. Slowly pour wine and whisk. Pour in ½ cup beef broth and continue to whisk until there are no lumps. Pour the rest of the beef broth and whisk. Add Worcestershire sauce and whisk. Turn down the heat to medium. Simmer for 10-15 minutes or until optimal consistency. Season with salt and pepper to taste. Optional: strain the gravy to remove any lumps.

Slice

Enjoy!
Recent Posts
Be sure to follow me on Facebook, Instagram, Twitter, Pinterest, YouTube or subscribe to the blog for emails and receive free EatFoodlicious recipes daily.
Share on social media

Beef Recipes
Dinner Recipes

Slow Cooker Brisket is an easy way to prepare a challenging cut of beef. It can be difficult to master how to produce tender and juicy brisket. This recipe was developed after several attempts and I believe you willl not be disappointed in how delicious the Beef Brisket method of preparation is. The brisket will be so tender you can separate it using a fork. Urban BBQ has found a new way to get an old recipe to the table. This recipe is perfect for beginners, homemakers that don’t want to get all smokey and anyone that loves to eat flavorful tender beef.
Simply watch the video and follow the instructions below to serve up a comforting old fashioned beef brisket tonight. Let the Slow Cooker work its magic and enjoy a juicy tender serving of this delicious brisket. Feel free to get creative with the sauce, my husband like to add a bit of his favorite Kentucky Mash and apple cider to this recipe when he makes it at home. Share this or any of my recipes form the eatfoodlicious catalogue. Don’t forget to hit the subscribe button to stay up to date on all the latest eatfoodlicious publications. Thanks for visiting and see you again soon.
Please follow Facebook, Instagram, Twitter , Pinterest, or subscribe to my YouTube channel.

In a bowl: combine all the dry rub ingredients together and mix.

Combine all the BBQ sauce ingredients together and mix well. Set aside. Optional: favorite store bought BBQ sauce can replace in this step. Clean and pat the brisket dry with a paper towel. Trim and discard some of the fat. Rub the dry ingredients on both sides of the brisket (It’s going to be a very thick coat of the seasoning).

Place brisket in the slow cooker. Add BBQ sauce on top. Slow cook on low for 9 hours for 3 ½ lbs and 10 hours for 4 lbs.

Transfer the brisket to a plate/cutting board. Cover/tent with aluminum foil.

Transfer the liquid to a sauce pan. Simmer the sauce for 15-20 minutes or until it thickens.

Coat with BBQ sauce.

Slice the brisket. Plate the brisket and cover with BBQ sauce.
Recent Posts
Be sure to follow me on Facebook, Instagram, Twitter, Pinterest, YouTube or subscribe to the blog for emails and receive free EatFoodlicious recipes daily.
Share on social media

Slow Cooker Recipes
Beef Recipes

Delicious Texas Brisket Chili is a splendidly rich soup with delicious filing meaty ingredients, that is both hearty and worth the preliminaris to make. We enjoy our chili around my house. This recipe provides a nice inspirational twist to a well known main course and is a perfect soup for cold days or wintery nights. Start this dish for lunch or better yet the day before to have a well flavored soothing belly full of something good to eat. I prefer long cook times for chili to unlock all those subtle flavor notes and create new ones through natural marination, my family absolutely loves this and your will too. This is one of my go to dishes for putting the teenagers to work in the kitchen to learn to feed themselves. A beginner cook can open up a world of possibilities with little effort through the magic of following this recipe after watching the video. The authentically flavored stew such as this sends good old fashioned aromas throughout the home. Cooking something everyone loves to eat makes your hearts will swell with the pride of a good cook and it is a worthy satisfaction to watch the young ones step into that role.
Don’t skimp out on the presentation of your dish when making this at home. Take a look at the photos to see some suggestions that send visual invitations for a wanted first bite. Watch the video and follow the simple instructions below to have a hot bowl of comforting satisfaction at the ready. Like and share this or any of my recipes you find interesting from the growing catalog of eatfoodlicious meal suggestions. Don’t forget to hit the subscribe button to stay up to date with my latest publications. Leave a comment and let me know if you or your family enjoyed this creamy white chicken chili. Best served hot, this meat flavor infused Texas Brisket Chili is so good. May your next food adventure be one that is shared with those you love and with a taste that inspires the art of true living. Eat, enjoy and repeat.
Please follow Facebook, Instagram, Twitter , Pinterest, or subscribe to my YouTube channel.

Deseed the dried ancho (mild heat) or guajillo (medium heat) peppers and discard the seeds.

In a medium size pan: add 2 cups of water and bring it to a boil. Add the dried peppers and cook for 3 minutes or until softened. Remove the pan from the heat source. Let cool for at least 10 minutes.

Place the boiled peppers, with liquid (from the pan), and the rest of the mixture ingredients into a blender. Blend until smooth.


Heat the dutch oven or pot to medium-high. Add diced bacons to the pot and sauté for 5-8 minutes or until crispy. Remove the cooked bacon bites and set aside.

Add the seasoned meat and sear for 4-5 minutes or until all sides of the meat have browned.

Remove & set aside. You may need to do this in 2-3 separate batches to maintain good spacing during cooking.

Add butter and wait for a 30 seconds. Add chopped onions and cook for 2-3 minute or until fragrant. Deglaze: add ½ of the Mexican beer bottle and deglaze the bottom of the dutch oven/pot.

Return seared meat to the pot. Add pepper mixture, fire roasted diced tomatoes with green chilies

Add 1 ½ Mexican beer bottle, bacon bites and mix everything together. Place the bay leaves on top. Submerge the leaves into the liquid. Watch video for reference.

Turn down the heat to low-medium. Place the lid on the dutch oven and cook for 3 hours or until the meat is tender. Make sure to stir after 2 hours and add more water if needed to cover the meat. Remove the lid after 3 hours. Discard the bay leaves. Let simmer uncovered for 20 – 30 minutes or until the liquid is reduced in half. Optional: scoop out the grease floating on top of the stew. Stir the chili and season with salt to taste.

Recent Posts
Be sure to follow me on Facebook, Instagram, Twitter, Pinterest, YouTube or subscribe to the blog for emails and receive free EatFoodlicious recipes daily.
Share on social media

Soup & Stew Recipes
Beef Recipes

Nothing is better than a Hearty Beef Stew. Braised beef and onion are some of my favorite ways to unleash natural appeal to the cooking process. The kitchen starts to warm up from the cooking and the tantalizing aromas promised. Chuck is the preferred choice of meat as it does not get stringy. This recipe is perfect for prepping the “preliminaries” ahead of time and then combining the final fixings just prior to serving. This approach to creating a hearty meal covers some of the most succulent methods for flavor profiles and texture development.
I work to compress recipes into a short video with easy to follow recipes. However, I would like to acknowledge the giant that came before us that is the inspiration of this recipe. Try this dish and taste the elegance of this simple hearty stew.
Watch the video and follow the instructions below to flex your culinary acumen. Like and share this or any of my recipes you find interesting from my growing catalogue of menu selections. Don’t forget to hit the subscribe button to stay up to date on all the latest eatfoodlicious publications. And remember the key to a well braised meat is drying the the chuck to remove all water, otherwise you are just steaming and not growing. Thanks for visiting and see you again soon.
Please follow Facebook, Instagram, Twitter , Pinterest, or subscribe to my YouTube channel.

Pat the beef dry and place in a large bowl. Coat with salt, pepper and mix.

Heat the dutch oven or pot to medium-high. Add 2 tbsp oil and wait until hot. Place half of the beef in the dutch oven/pot and sear all sides for 3-5 minutes or until brown (do not over crowd the meat). Remove the beef and set aside. Repeat this step with the other half of beef & remove.

In the same dutch oven/pot: add ¼ cup butter and wait for 30 seconds. Add onions & sauté for 5-6 minutes.

Add garlic and sauté for 30 seconds.

Add tomato paste, Worcestershire sauce and mix everything together. Sauté for 2-3 minutes. Sprinkle flour and mix everything together. Pour red wine and deglaze the bottom of the pot. Turn up the heat to high and bring to a simmer.

Return seared beef to the pot. Pour in beef broth. Add chopped carrots & potatoes. Do not stir. Add herb bouquet: thyme, bay leaves & rosemary. Cover the pot with a lid. Place the dutch oven/pot in the middle rack of the oven.

Cook for 5 minutes at 400°F (make sure to have the timer on). Then, turn down the oven to 325°F. Cook for 2 ½ – 3 hours or until the meat is fork tender Remove pot from oven. Discard herb bouquet. Gently stir the everything together with a wooden spoon.

Add 4 tbsp cold butter (not softened). This is called Monter au Beurre in French, sauce with butter. Gently stir everything together until the butter is fully melted.

Season with salt & pepper to taste if needed.

Recent Posts
Be sure to follow me on Facebook, Instagram, Twitter, Pinterest, YouTube or subscribe to the blog for emails and receive free EatFoodlicious recipes daily.
Share on social media

Beef Recipes
Dutch Oven Recipes

Juice and delicious flavor drip from this hearty Slow Cooker Roast Beef Po’Boy for comforting satisfaction with homemade beef gravy. The beef creates a steaming scent of roasted deliciousness as you approach the first bite. If feeling bold, just add some mayonnaise with hot sauce to create a filling juicy sandwich that will require a few napkins. I highly recommend using garden fresh tomatoes from local farmers market if you can still find them. They will add juicy bursts to the gravy soaked bread and complete the foodlicious experience. Lips will be smacking as lightly toasted bread crunches from the hungry eaters that have been pacing around the kitchen in anticipation because the gravy fills the room and your mouth with anticipation.
This affordable and easy to make selection is perfect on any occasion. Full of flavor, textures and at a budget price, this is perfect normal meal planning. Quick and tasty this recipe will drive everyone in the house to the table at neck break speed. Watch the video and follow the instructions below to have a deliciously gigantic Roast Beef Po’Boy today. Like and share this or any of my recipes you find interesting from my growing catalogue of menu selections. Don’t forget to hit the subscribe button to stay up to date on all the latest eatfoodlicious publications. Succulent sauce and juicy meat make this sandwich a must try. Thanks for visiting and see you again soon.
Please follow Facebook, Instagram, Twitter , Pinterest, or subscribe to my YouTube channel.

Pat the chuck roast dry with a paper towel. Season with salt and pepper. Heat the pan/skillet to medium-high. Add 2 tbsp butter, olive oil and wait for it to get hot. Sear the roast chunk for 4-5 minutes per-side. Remove the roast and set aside.

Add 2 tbsp butter and wait for it to melt. Add sliced onions and sauté for 10-12 minutes or until caramelized. Add minced garlic and sauté for 1 minute.

Place the seared roast in the slow cooker. Add cajun seasoning, caramelized onion, beef broth & bay leaves.

Cook on low for 8-10 hours or high for 5-6 hours or until fork tender.

Discard the bay leaves. Remove the roast and place in a medium-large sized bowl. Using 2 forks, shred the meat. Cover with aluminum foil until ready to eat.

In a small bowl: combine cornstarch and water, mix until the cornstarch is fully dissolved. Transfer the broth to a pan. Add cornstarch mixture and mix. Turn the heat to medium and let simmer for 10-15 minutes or until thickens to your liking. Season with salt & pepper to taste. Optional- Set the slow cooker to high. Add cornstarch mixture to the slow cooker and simmer for 20 minutes or until desired consistency. Season with salt & pepper to taste.

Pour 1-2 cups of gravy over the shredded meat and mix. Toast Bread – Preheat the oven to 300°F (148°C). Slice the bread in half (vertically). Spread melted butter/ mayo on the inside of the bread. Lay the bread butterside down on a baking pan. Bake for 2-3 minutes. Remove bread from the oven.

Prepare Sandwich – smear a generously amount of mayo on the bread. Add shredded meat, lettuce & tomatoes on top. Place some of the dip in a small serving bowl.

Recent Posts
Be sure to follow me on Facebook, Instagram, Twitter, Pinterest, YouTube or subscribe to the blog for emails and receive free EatFoodlicious recipes daily.
Share on social media

Slow Cooker Recipes
Beef Recipes

Instant Pot Oxtail is perfectly tender and delicious for a comforting meal at home. Serve with rice or on a bed of fresh mashed potatoes for a complete balanced meal. Oxtail is a traditional feature in many Asian recipes and is full of fatty delicious juicy meat that create a succulent broth you won’t soon forget. Full of flavor, textures and at a budget price, this is perfect normal meal planning. This meal keeps great in the refrigerator and heats up with little effort to have a ready to go meal almost anytime of the week. My family loves the juices that permeate the meat and once you try it you will too.
Watch the video and follow the instructions below to have this succulent meal ready to go today. Like and share this or any of my recipes you find interesting from my growing catalogue of menu selections. Don’t forget to hit the subscribe button to stay up to date on all the latest eatfoodlicious publications. Best served fresh. This meal is comforting and rewarding and can be featured in a multitude of applications. I enjoy in a nice broth, with rice or even mashed potatotes. Thanks for visiting and see you again soon.
Please follow Facebook, Instagram, Twitter , Pinterest, or subscribe to my YouTube channel.

Clean and pat the oxtails dry.

Season both sides with salt and pepper.

Set cooker to saute-high and add olive oil. Place half of the oxtails in the cooker.

Cook/sear all sides for 3-5 minutes per-side or until brown. Remove the oxtail and set aside. Repeat this step with the other half of beef. Add oil if needed.

Add onion, garlic and cook for ~60 seconds or until fragrant.

Add tomato paste and stir for a few seconds.

Return seared oxtails into the cooker. Place bay leaves & thyme on top.

Then add carrots, beef broth, red wine, Worcestershire sauce and mix.

Place the lid on. Pressure cook on high for 45 minutes, followed by a natural release (approx. 30-45 minutes). Follow the manufacture instructions for releasing the pressure. Remove the lid. Discard the bay leaves & thyme. Scoop out and discard grease. Transfer oxtails & carrots to a bowl/plate. Cover with saran wrap until ready to serve.

In a small bowl: combine cornstarch with cold water. Stir until the cornstarch has fully dissolved. Set cooker back to saute-high. Pour the cornstarch mixture into the liquid. Gently stir the stew with a ladle. Simmer until the liquid reduces to your liking. Season with salt & pepper to taste.

Recent Posts
Be sure to follow me on Facebook, Instagram, Twitter, Pinterest, YouTube or subscribe to the blog for emails and receive free EatFoodlicious recipes daily.
Share on social media

Instant Pot Recipes
Beef Recipes

No Smoker Homemade Pastrami is delicious and tender, my family loved it and yours will too. Your heart will beat like a fantastic drum to the rhythm of balanced aromas inviting you to the serving table as your eyes drink in the gentle whispers of this simple to make savory Pastrami sandwich. My family was up to the challenge of this large sandwich, but feel free to tailor your to the size of your appetite. This recipe is basically effortless it just takes place over many days. The time it takes for natural non-preservative flavors to cure into the meat making this pastrami a homemade triumph that your family will absolutely love.
Watch this video and follow the detailed instructions below to put a hearty satisfying juice dripping homemade Pastrami sandwich on the dinner table today. Like and share this or any of my recipes you find interesting from the growing catalog of tasty menu selections. Don’t forget to hit the subscribe button to stay up to date on all the latest eatfoodlicious publications. The meat from this recipe is so tender you can cut it with a fork and my mouth is watering just thinking about taking another bite. Leave a comment and let me know if you enjoyed this recipe or if you have any questions, as I love to talk about food. Have a safe rest of your week and see you again soon!
Please follow Facebook, Instagram, Twitter , Pinterest, or subscribe to my YouTube channel.

In a medium size pot: add 2 ½ cups of water and bring it to a boil. Add kosher salt, granulated sugar, brown sugar, Prague powder (pink curing salt) & smoke salt. Stir until everything is fully dissolved. Turn off the heat. Add bay leaves, whole peppercorn, garlic cloves, allspice, whole cloves and mix. Remove the pot from the heat source.

Add 8 cups ice and let sit at room temperature or until completely cooled & cold.

Clean and pat the brisket dry with a paper towel. Trim and discard some of the fat. Pour the brine mixture into a very big container (with lid) that will fit your brisket. Add the brisket into the container. Make sure that the brisket is submerged into the liquid. Add 1-2 cups of ice if needed to cover the brisket. Cover with lid. Refrigerate for 6 days undisturbed. No need to rotate the brisket, it’s submerged in the brine.

In a non-stick pan or skillet: add smoke salt, whole peppercorn, mustard seeds & coriander seeds. Turn up the heat to medium-high. Toast for 5-8 minutes or until fragrant. Remove the pan from heat source. Let cool.

Grind or mash the toasted seasoning until fine/coarse texture.

Set aside until ready to use.

Preheat the oven to 275°F. Wrap the baking sheet in aluminum foil for easy cleaning later.

Remove brisket from the brine. Clean, rinse and pat the brisket dry with paper towel. Coat toasted seasoning all over the brisket.

Use a toothpick and poke several holes in the center of the on aluminum foil. Place meat in the middle of the foil (on top of the holes). Wrap the meat with aluminum foil. Place meat on the baking sheet. Cook for 5 minutes at 275°F. Turn down the heat to 200°F and cook for 10 hours (2 hours per-lb). Remove the baking sheet from the oven. Let completely cool at room temperature; about 2-3 hours.

Do not remove foil from the brisket. Cover and place cool brisket in a clean pan. Refrigerate overnight (8-10 hours).

Preheat the oven 350°F. Wrap a baking sheet in aluminum foil for easy cleaning later. Place a baking rack on the baking sheet. Remove the meat from the refrigerator and discard the foil. Place the meat on the baking rack. Add hot/boiling water to the baking sheet (filling half way). Place the baking sheet in the middle of the oven. Cook & steam for 30 minutes.

Remove meat from the oven & let rest for 15 minutes before slicing.


Recent Posts
Be sure to follow me on Facebook, Instagram, Twitter, Pinterest, YouTube or subscribe to the blog for emails and receive free EatFoodlicious recipes daily.
Share on social media

Beef Recipes
Main Courses

Fork tender Red Wine Pot Roast is absolutely delicious. The aromas are so inviting everyone will know something tasty is in the works. Serve with rice or a bed of fresh mashed potatoes for a complete balanced meal. Salad, vegetables, Texas toast or French bread also make good partners for this dish. This affordable and easy to make selection is perfect on any occasion. Full of flavor, textures and at a budget price, this is perfect normal meal planning. This meal keeps great in the refrigerator and heats up with little effort to have a ready to go meal almost anytime of the week. My family loves the succulent juices and enjoys this meal to the last bite.
Watch the video and follow the instructions below to have this succulent meal ready to go today. Like and share this or any of my recipes you find interesting from my growing catalogue of menu selections. Don’t forget to hit the subscribe button to stay up to date on all the latest eatfoodlicious publications. Among the most flavorful cuts for beef pot roast are those that come from the chuck (between the neck and shoulder blade) of the animal. These include cuts labeled chuck arm pot roast, chuck shoulder pot roast, and chuck seven-bone roast. Best served fresh this simple to prepare meal is a must try. Thanks for visiting and see you again soon.
Please follow Facebook, Instagram, Twitter , Pinterest, or subscribe to my YouTube channel.

Clean and pat the roast dry. Season both sides with salt and pepper.

Heat the dutch oven or pot to medium-high. Add 2 tbsp oil and wait until hot. Place beef in the dutch oven/pot and sear both sides for 3-5 minutes or until brown. Remove the beef and set aside.

In the same dutch oven/pot: add butter and wait for 30 seconds. Add onions, and sauté for 5-6 minutes.

Add celery, carrots and mix everything together. Add garlic and sauté for 2-3 minutes or until fragrant. Add tomato paste and mix. Sprinkle flour and mix everything together. Pour beef broth and deglaze the bottom of the pot.

Return seared beef to the pot. Add red wine and mix. Turn up the heat to high and bring to a simmer. Add thyme, bay leaves & rosemary. Cover the pot with a lid.

Place the dutch oven/pot in the middle rack of the oven. Cook for 5 minutes at 400°F (make sure to have the timer on). Then, turn down the oven to 300°F. Cook for 3 ½ hours (for 3.5 lbs) to 4 hours (for 4 lbs) or until the meat is fork tender. Remove pot from oven. Discard bay leaves, rosemary & thyme. Gently stir the everything together with a wooden spoon.

Season with salt & pepper to taste.

Recent Posts
Be sure to follow me on Facebook, Instagram, Twitter, Pinterest, YouTube or subscribe to the blog for emails and receive free EatFoodlicious recipes daily.
Share on social media

Beef Recipes
Main Courses


